Migrating From OPNsense to Mikrotik
Bye-bye OPNsense, hello Mikrotik! Upgrading to an RB5009 MikroTik router.
Today, I’m excited to share with you a little tale from my Homelab adventures. You see, I recently made a decision—a decision to bid farewell to my trusty DIY firewall setup and embark on a journey with a new companion: the Mikrotik RB 5009UG+S+IN.
Now, why the switch, you ask? Well, grab a seat, and let me walk you through the story behind this upgrade. From the humble beginnings of my DIY server to the unboxing of the sleek Mikrotik device, we’ll dive into the good, the bad, and the ugly!
🔩 Server Specs
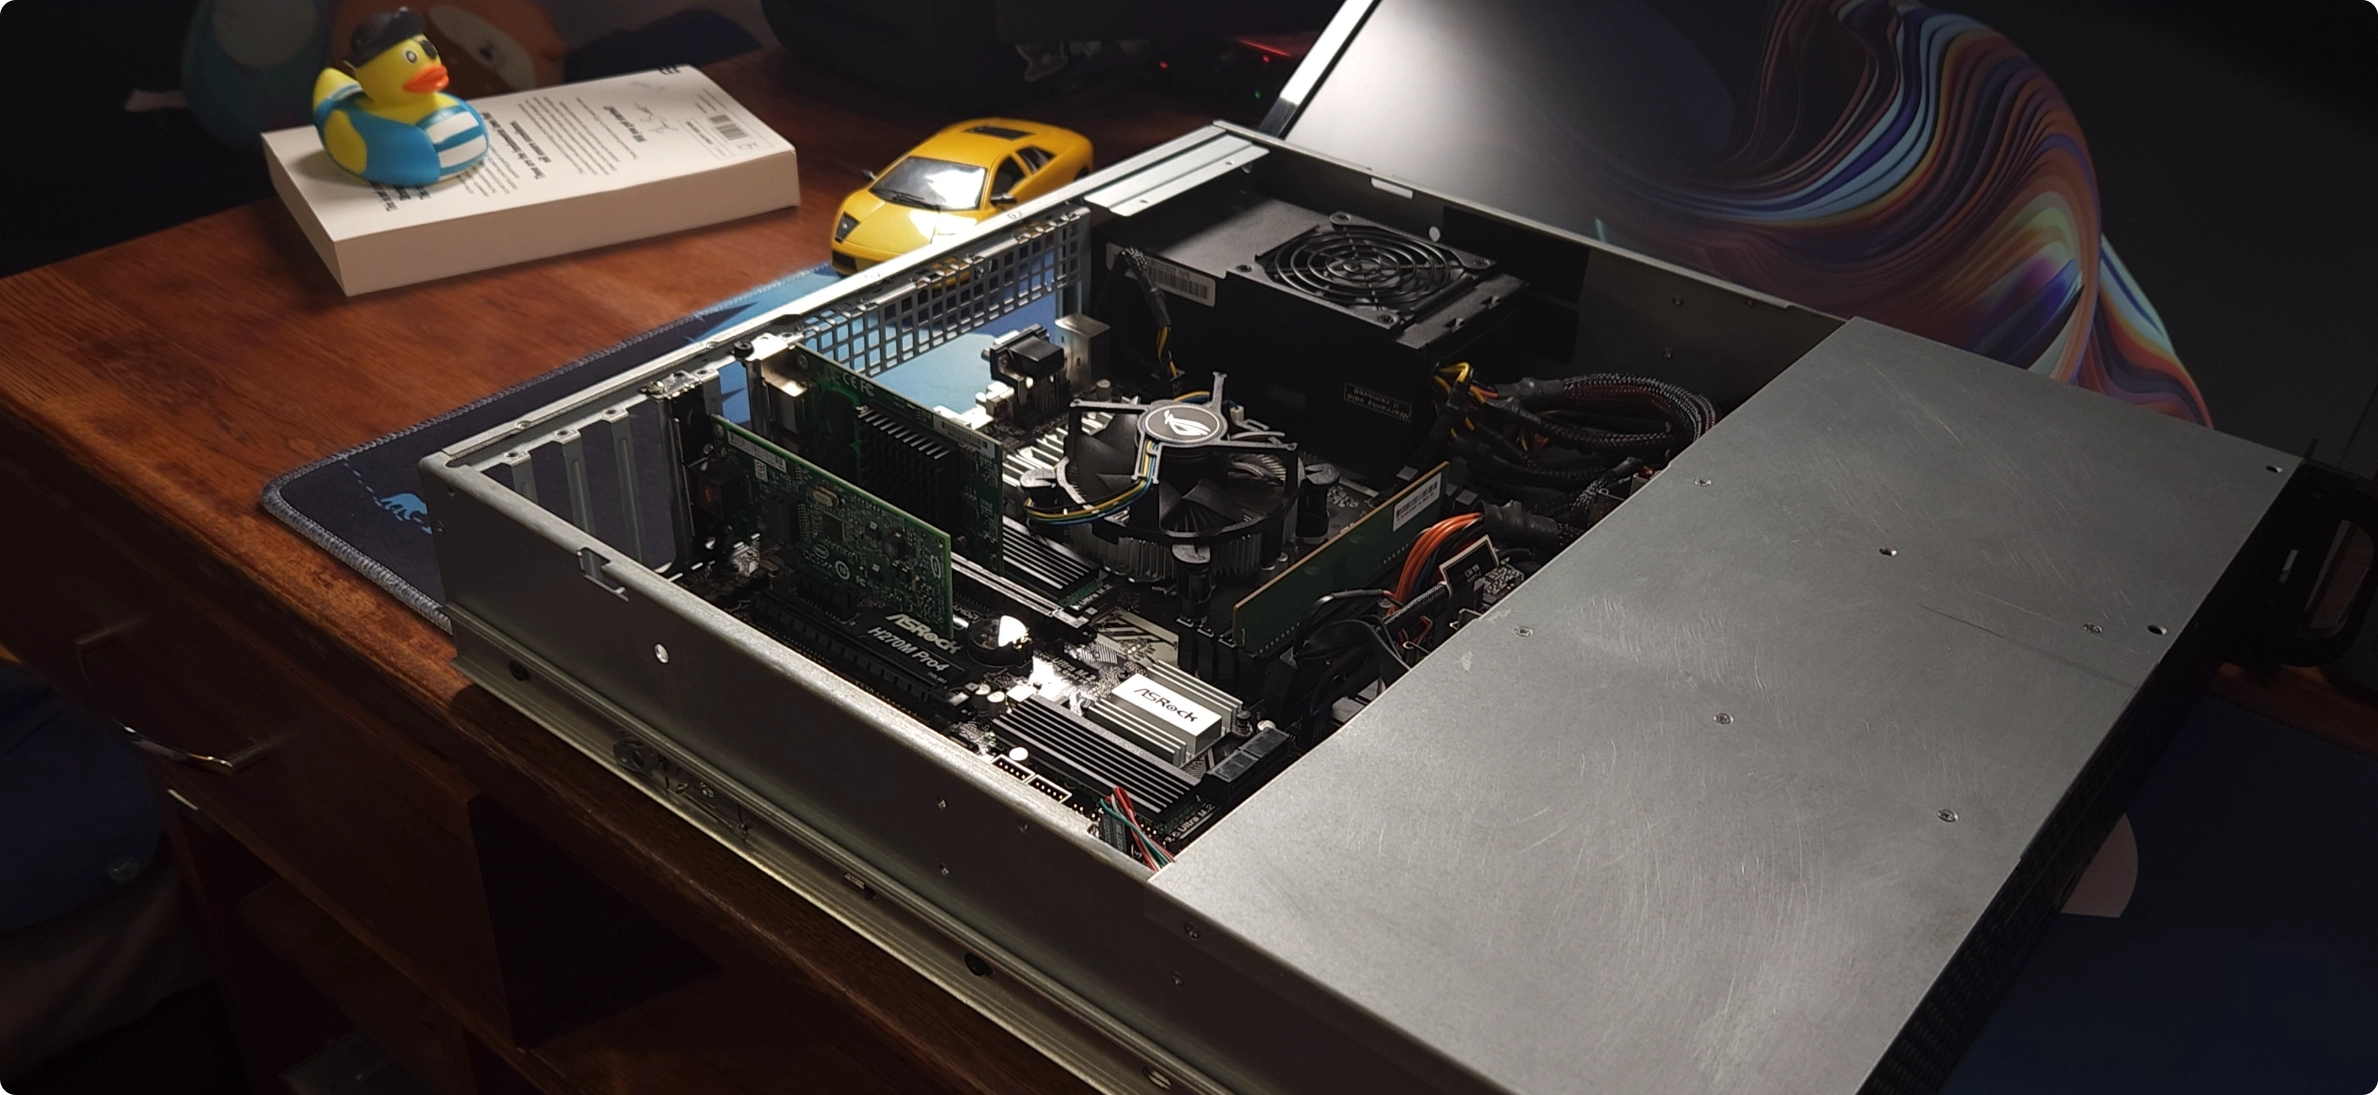 OPNsense server with the top panel off, showcasing the internals
So, let me give you the rundown of my current setup. It’s a DIY rig rocking an i5 6500 processor, cooled by the trusty Intel stock cooler. We’re talking 8 gigs of RAM in the most performance-optimized single-stick configuration, with a pair of 256 GB NVMe SSDs in a ZFS mirror for the OS.
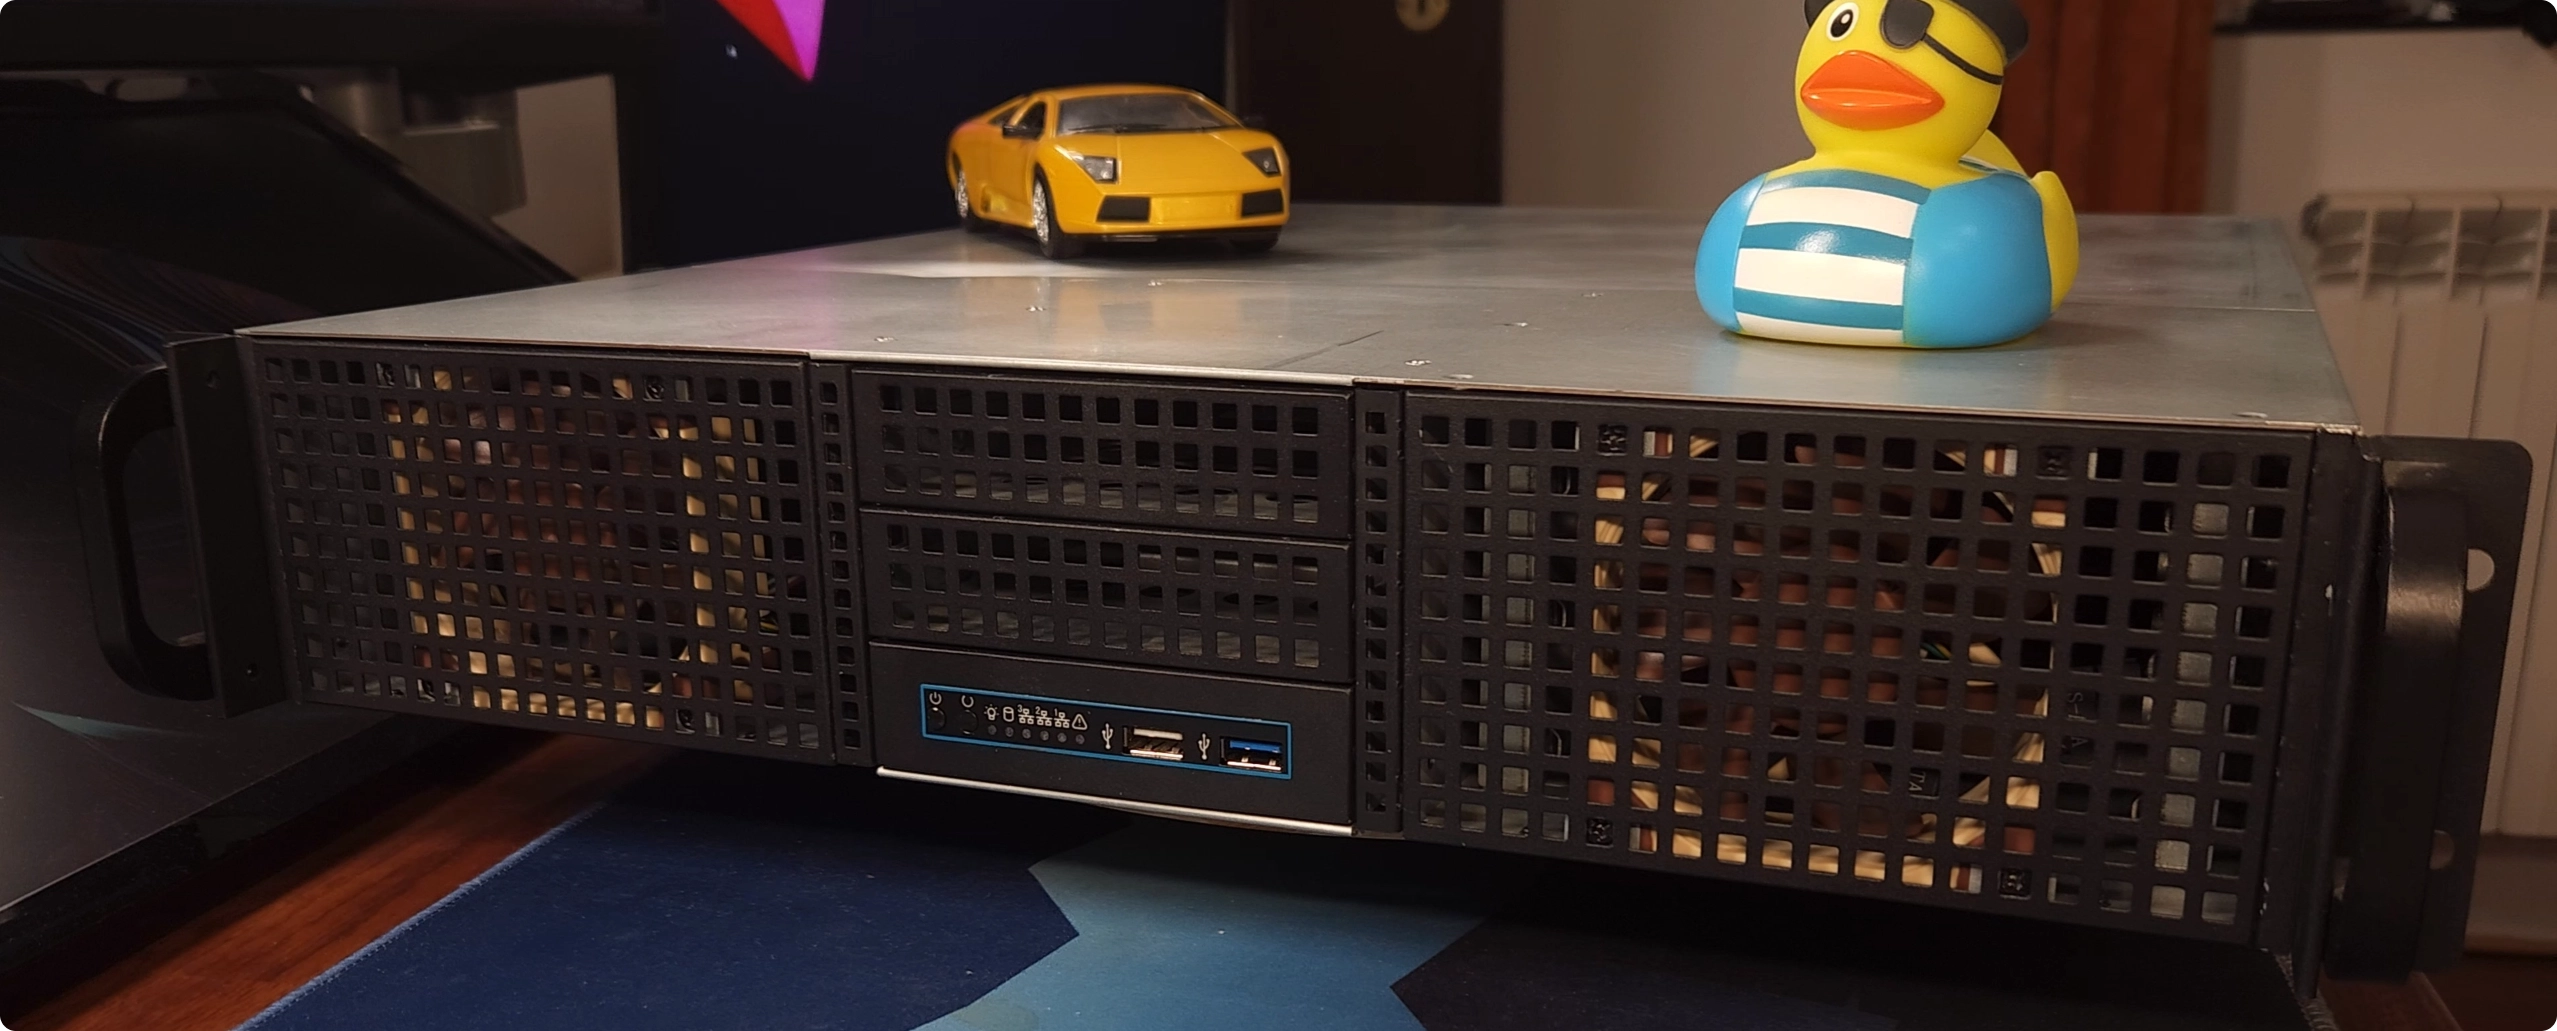 OPNsense server, front view showing the 80mm Noctua fans
The whole shebang is housed in an InterTech 2U-20248 case, with a couple of 80mm Noctua fans keeping things cool and quiet. The case is the middle child in the 2U InterTech lineup. They also make the 2U-20255 which is the bigger, longer case, featuring a bank of 4x hot-swappable 80mm fans in the middle, as well as the 2U-20240 which is basically just like this 20248 I have right here but a bit shorter.
 OPNsense server, power supply top view
And let’s not forget the power supply. It’s all being powered by the BeQuiet 300W PSU. Initially, it was double-sided velcro-taped to the side of the case, and you can still see what remains of that as I apparently never peeled the tape off the case.
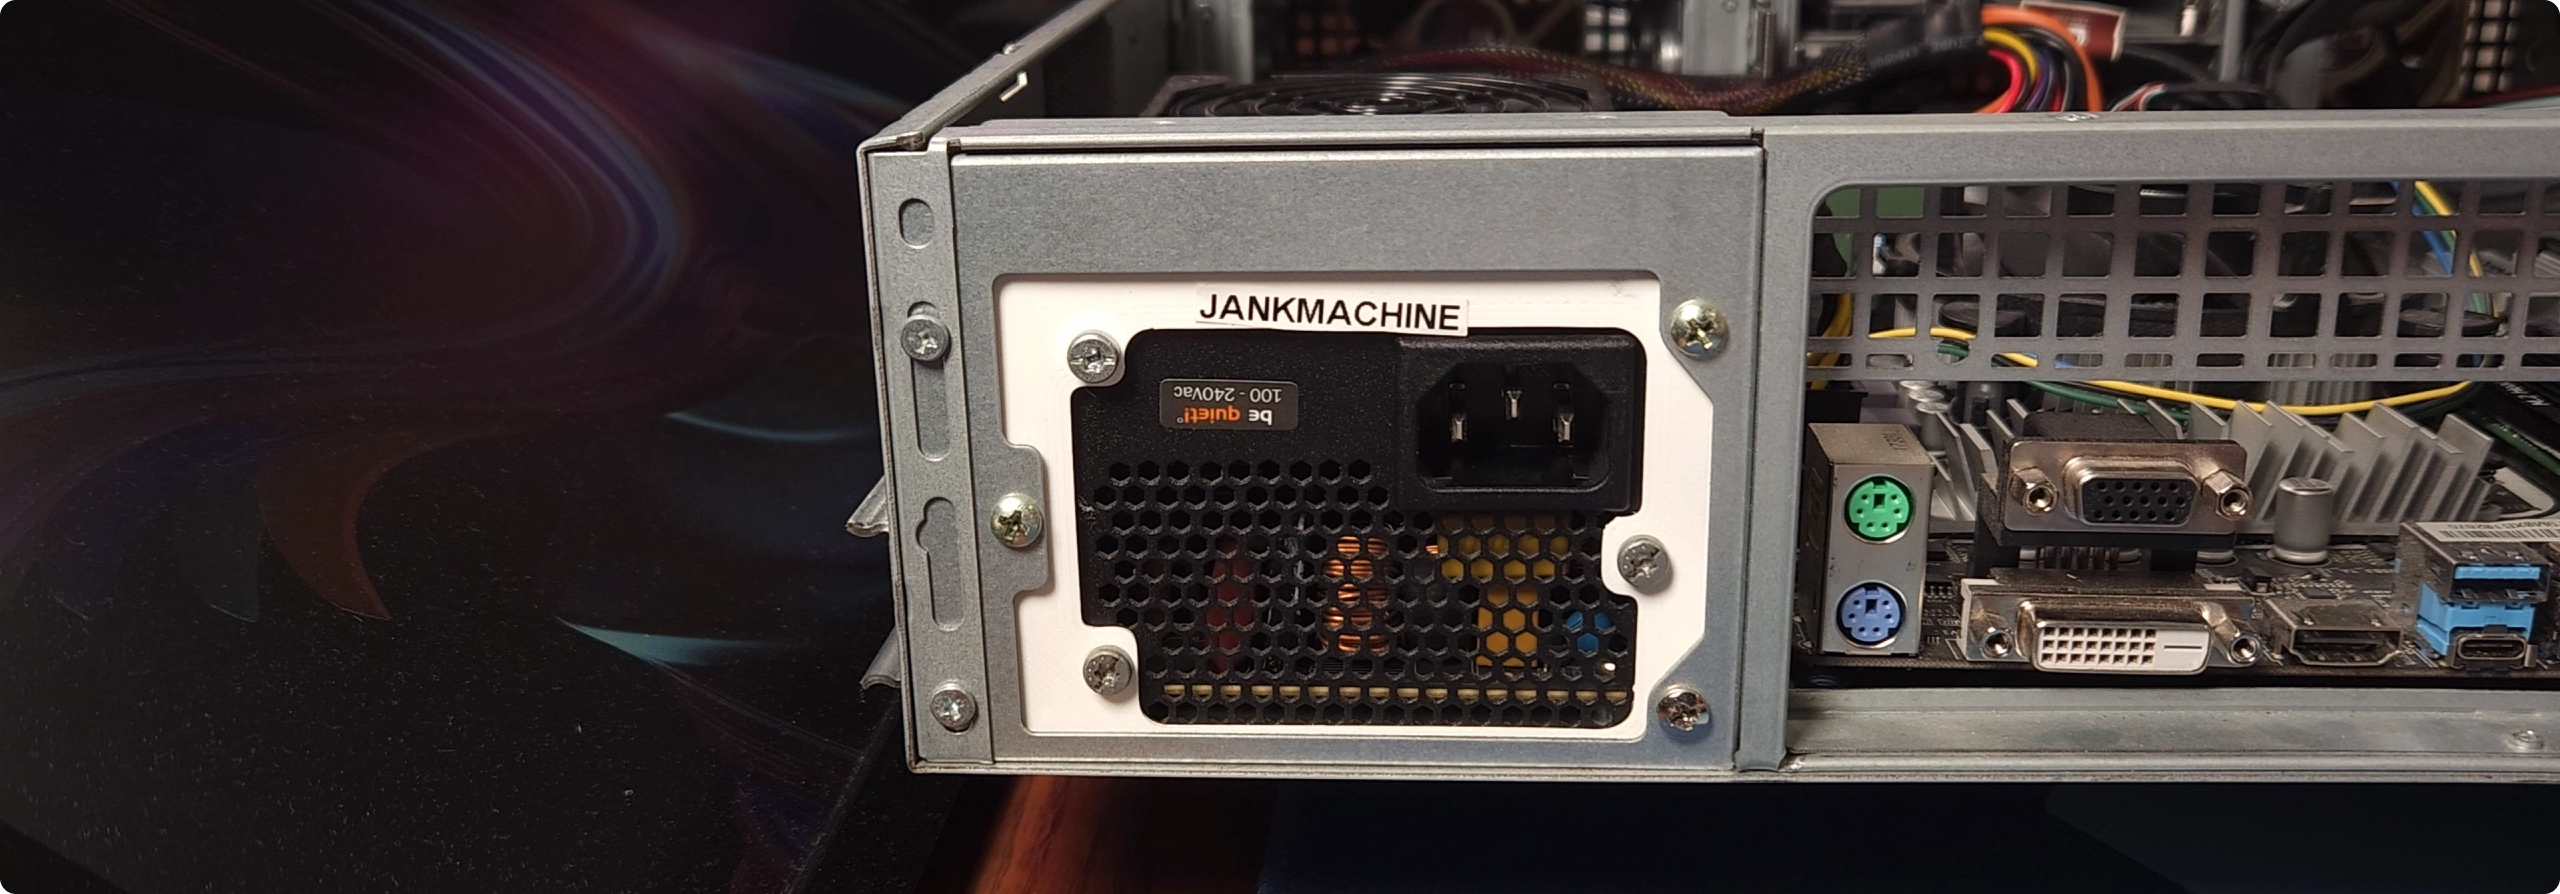 OPNsense server, 3d-printed power supply bracket
Nowadays, it is “securely” bolted in with a 3D-printed bracket thanks to one of my buddies that has a 3D printer.
 OPNsense server, read-io showcasing the network interfaces
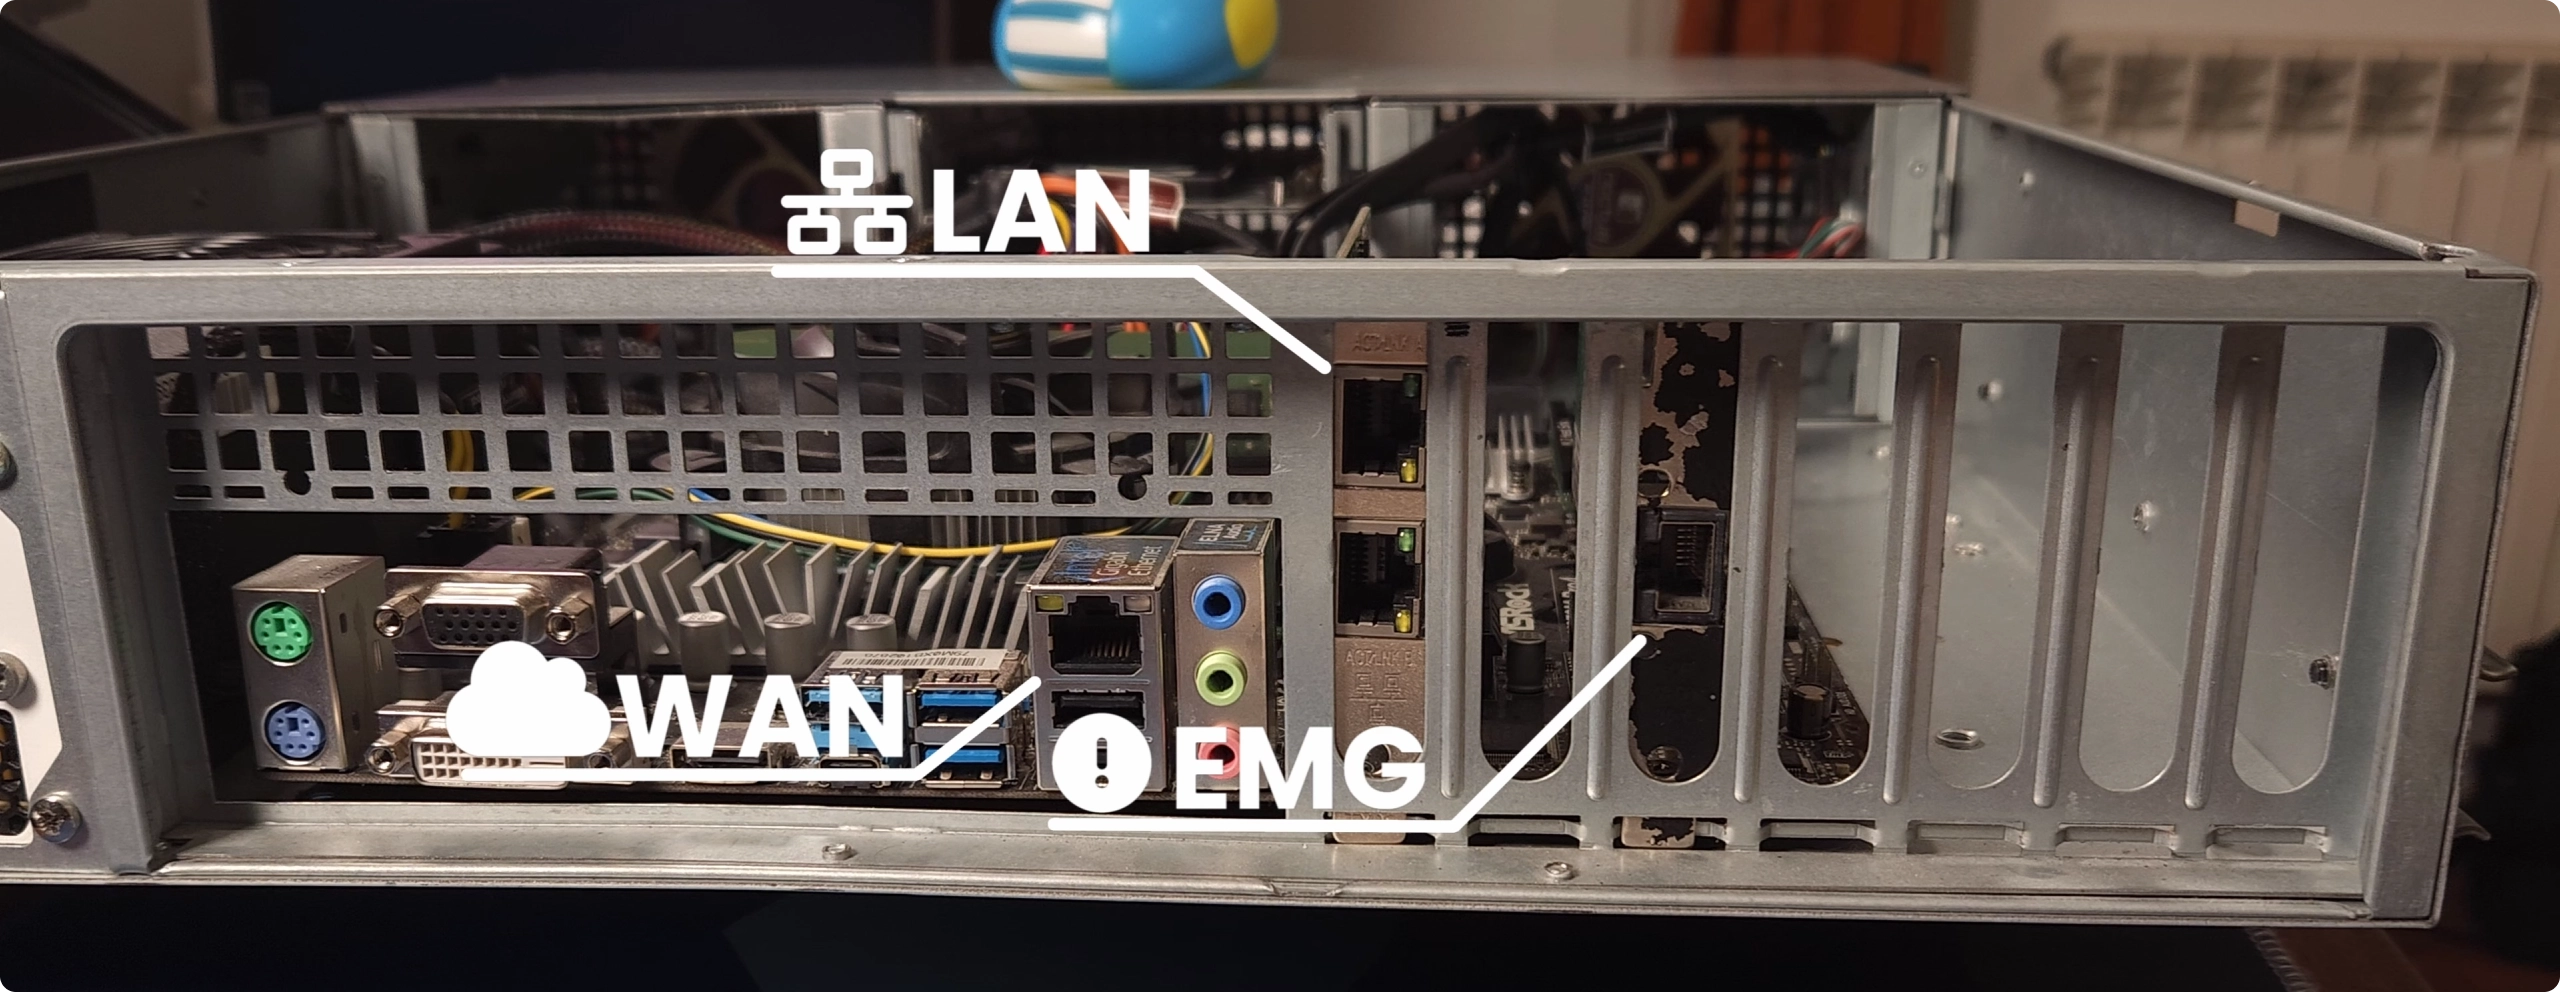
Finally, onto networking. We’ve got the onboard Intel NIC as our WAN port and a dual-port Intel add-in NIC configured as a LAGG for my LAN. All of my other networks are VLANs attached to this LAGG.
Oh, and there’s another single-port NIC reserved for emergencies, because, well, better safe than sorry! This is just a network with an allow-all firewall rule, essentially allowing me to do anything when I’m plugged into it. It’s there in case I break things and need to fix them 😅
📖 Story Time
This server has been through quite the journey through its lifetime. It started life as an HP prebuilt back in my high school days. Dad used it to bribe me to learn programming, the deal being that I have to go through a “Learn C++ in 21 days” book (spoiler alert, it took me way more than 21 days 😅).
After a while, during my 2nd year in university, I built my own gaming PC, and I was left with this old one collecting dust in my room. Dad came in again, being devil’s advocate, and suggested I install ESXI on it to try it out and play with VMs. And so I did. From being my trusty desktop to morphing into an ESXi host, then runngin Proxmox, then pfSense, and finally settling down as OPNsense – this computer has seen it all!
Unfortunately, the motherboard in the original system died, but the CPU (and memory, I think, though I am not entirely sure after all this time) is still going strong all these years (8 at this point) later.
📦 Unboxing and Overview
Enter the Mikrotik RB5009UG+S+IN – a slick, low-power RouterOS device with a nifty array of ports, including some 10-gig and 2.5 gig connectivity!
 Mikrotik RB5009, seen from the front, showcasing the connectivity
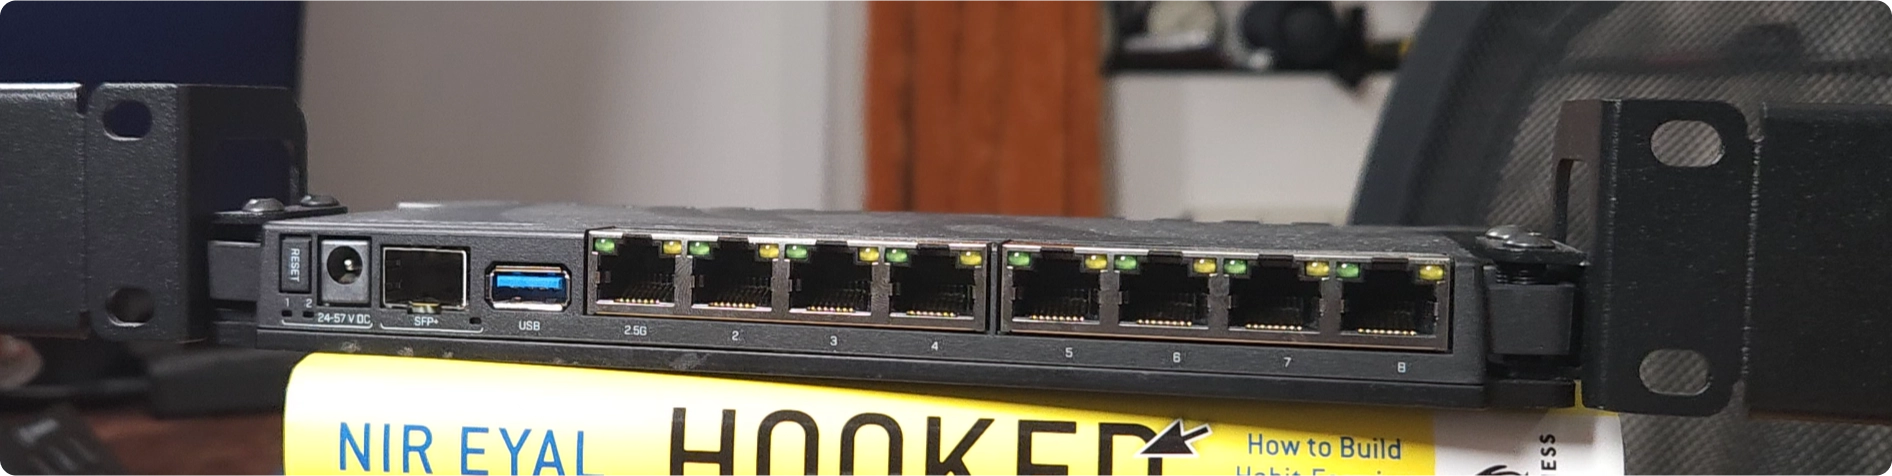
First off, starting from the front of the device we’ve got:
- Reset Button, allowing us to revert the device to the default configuration,
- DC Power Input, taking anything from 24 to 57V,
- 10 gigabit SFP+ port, by default configured to be bridged in the LAN network
- USB 3.0 type A port,
- 2.5 gigabit RJ45 port, supporting PoE input, configure by default as the WAN port
- 7x 1 gigabit RJ45 ports, bridged together with the 10g SFP+ port in the LAN network
 Mikrotik RB5009, seen from the side, showcasing the DC power terminal
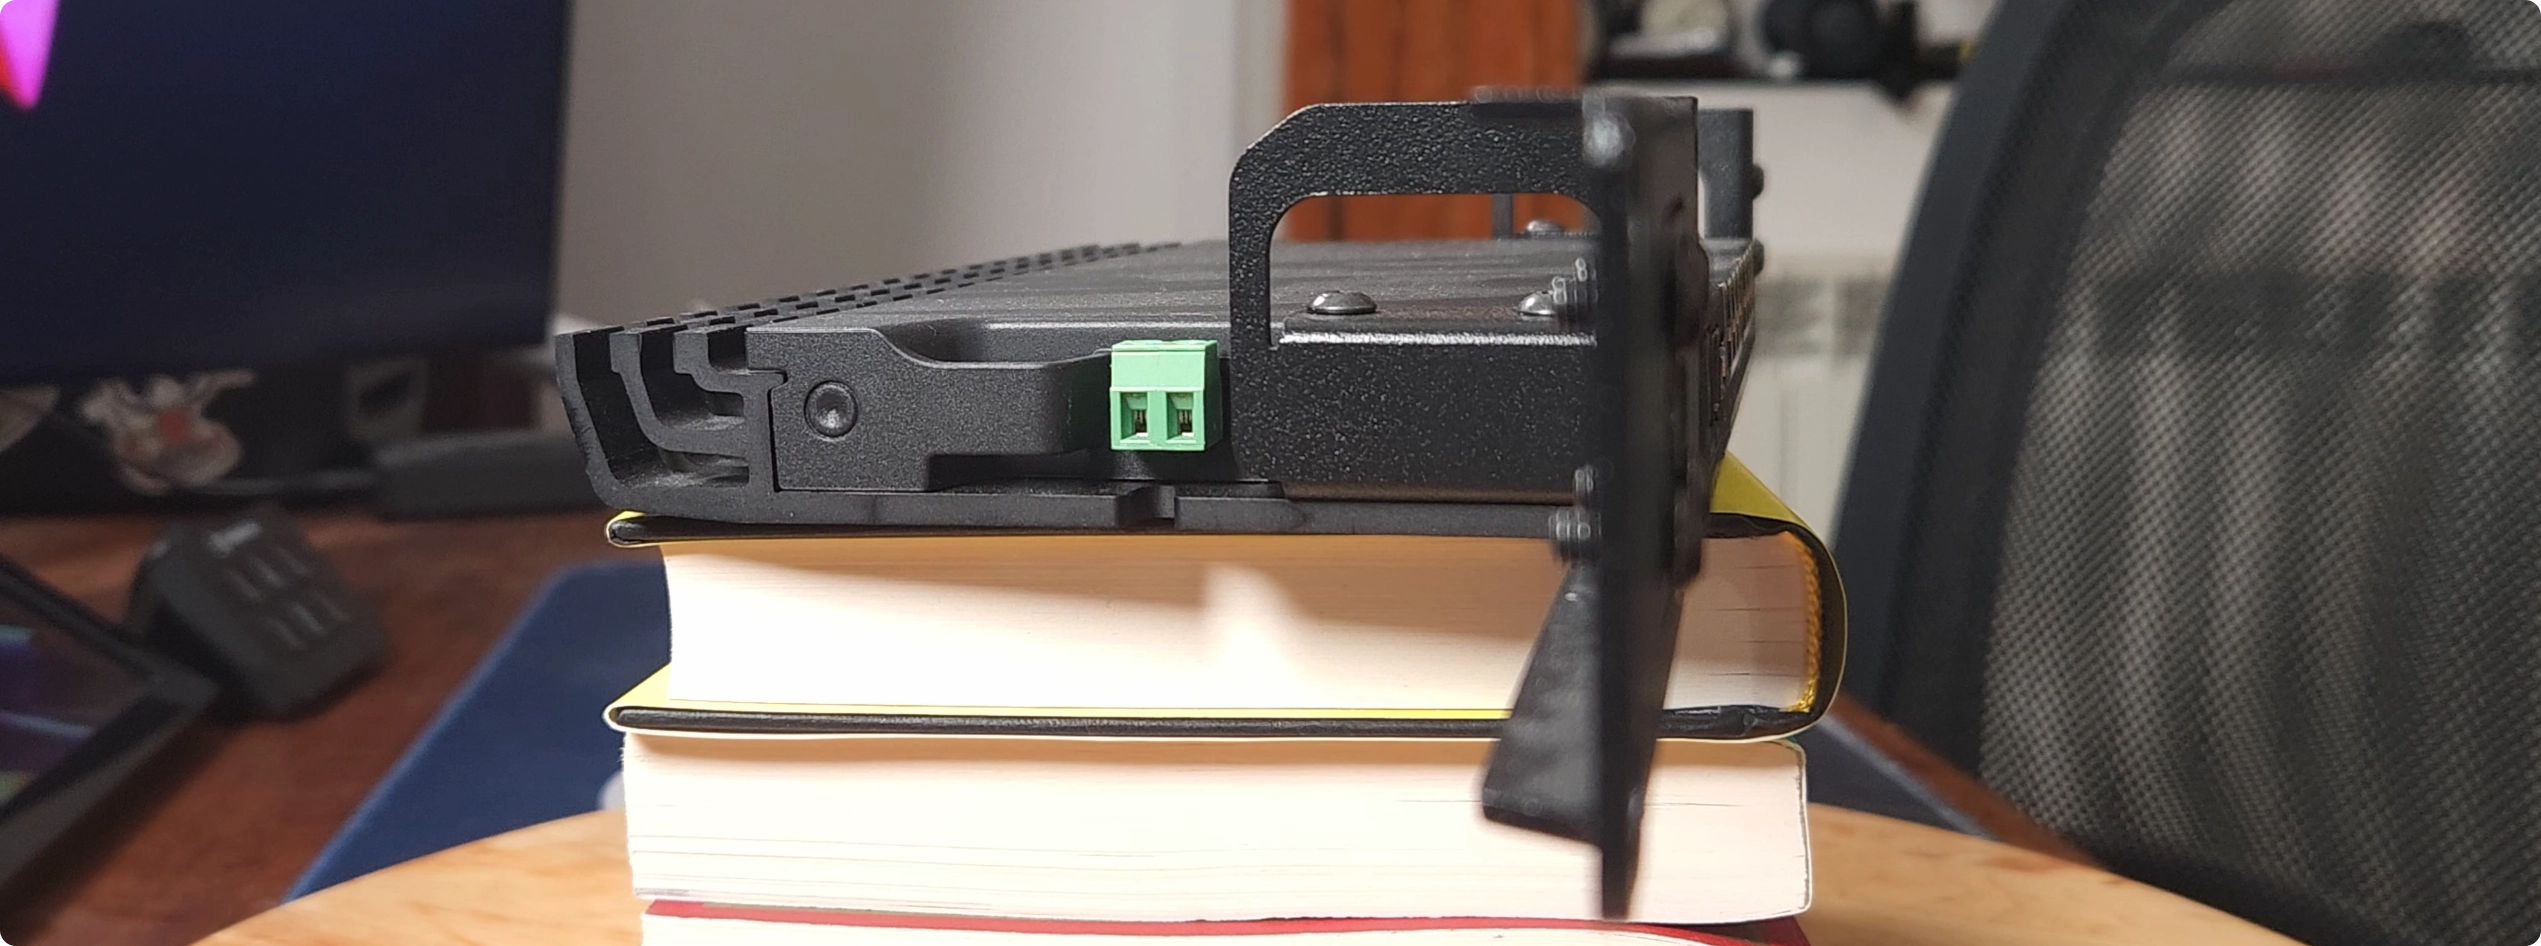
Moving on to the left side, we have a DC terminal for power input, accepting any voltage in the 24-57 range. If you’re paying attention, this makes it the 3rd powering option for this device. We have a DC power jack, a DC terminal, and PoE in on port 1!
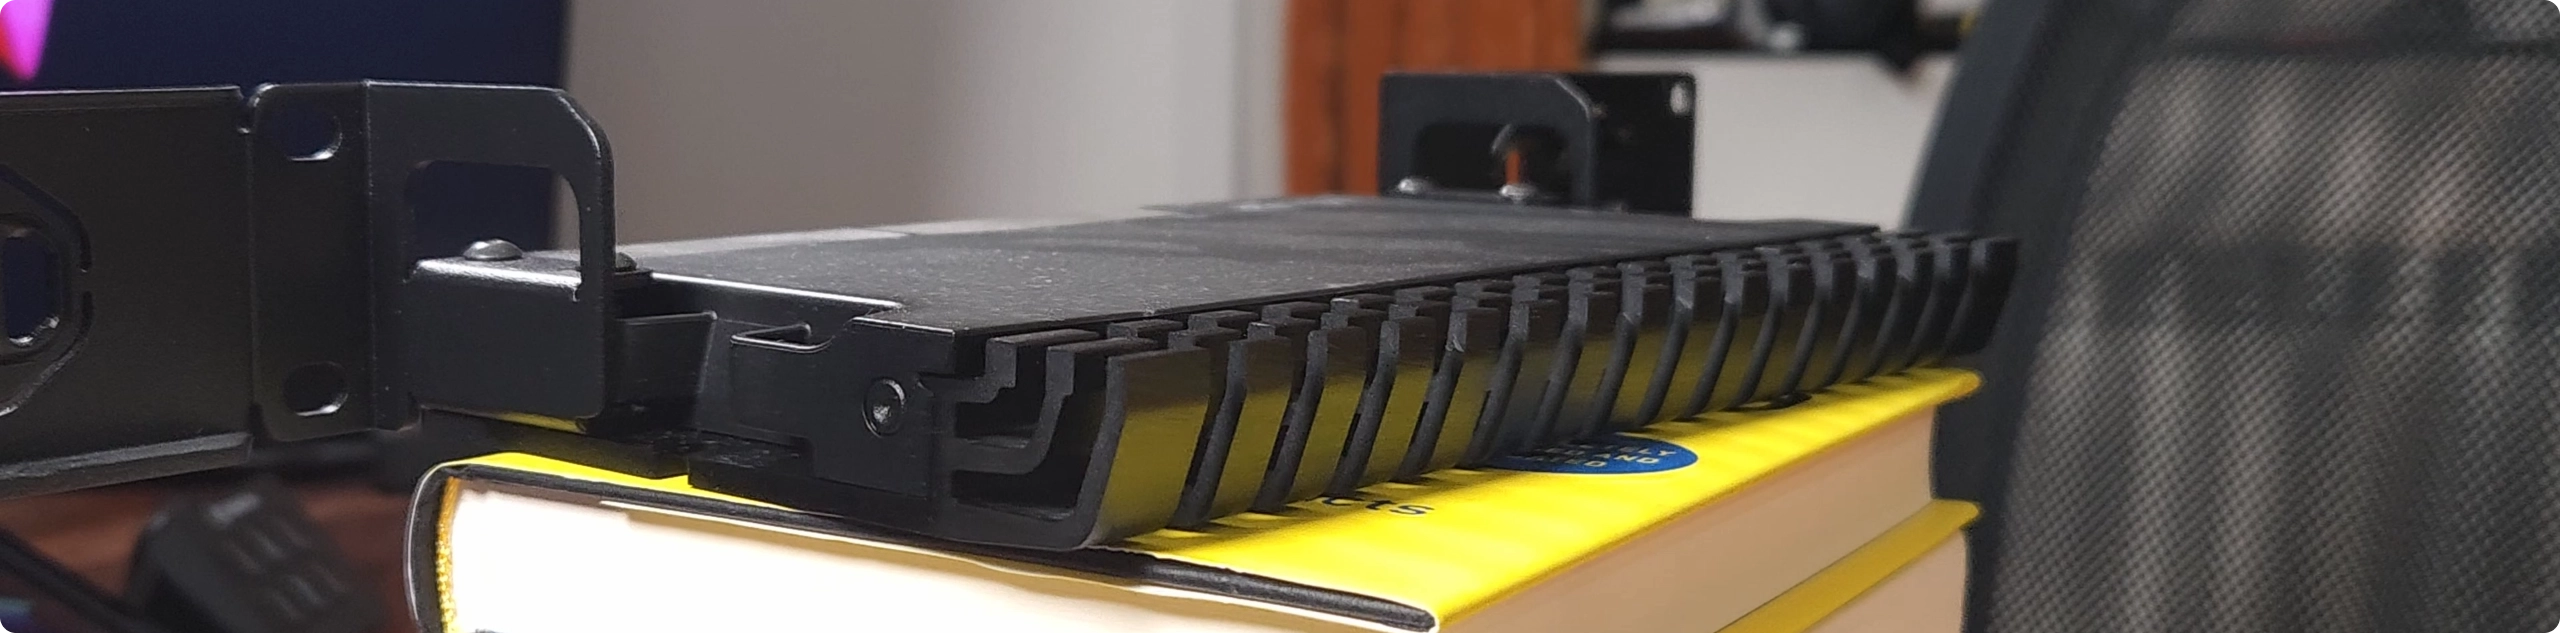 Mikrotik RB5009, seen from the back-right, showcasing the passive heatsink
Other than that, we have a pretty beefy heatsink that is visible on the back of the device, heatsink that is used to cool the internals, keeping the device fanless and quiet.
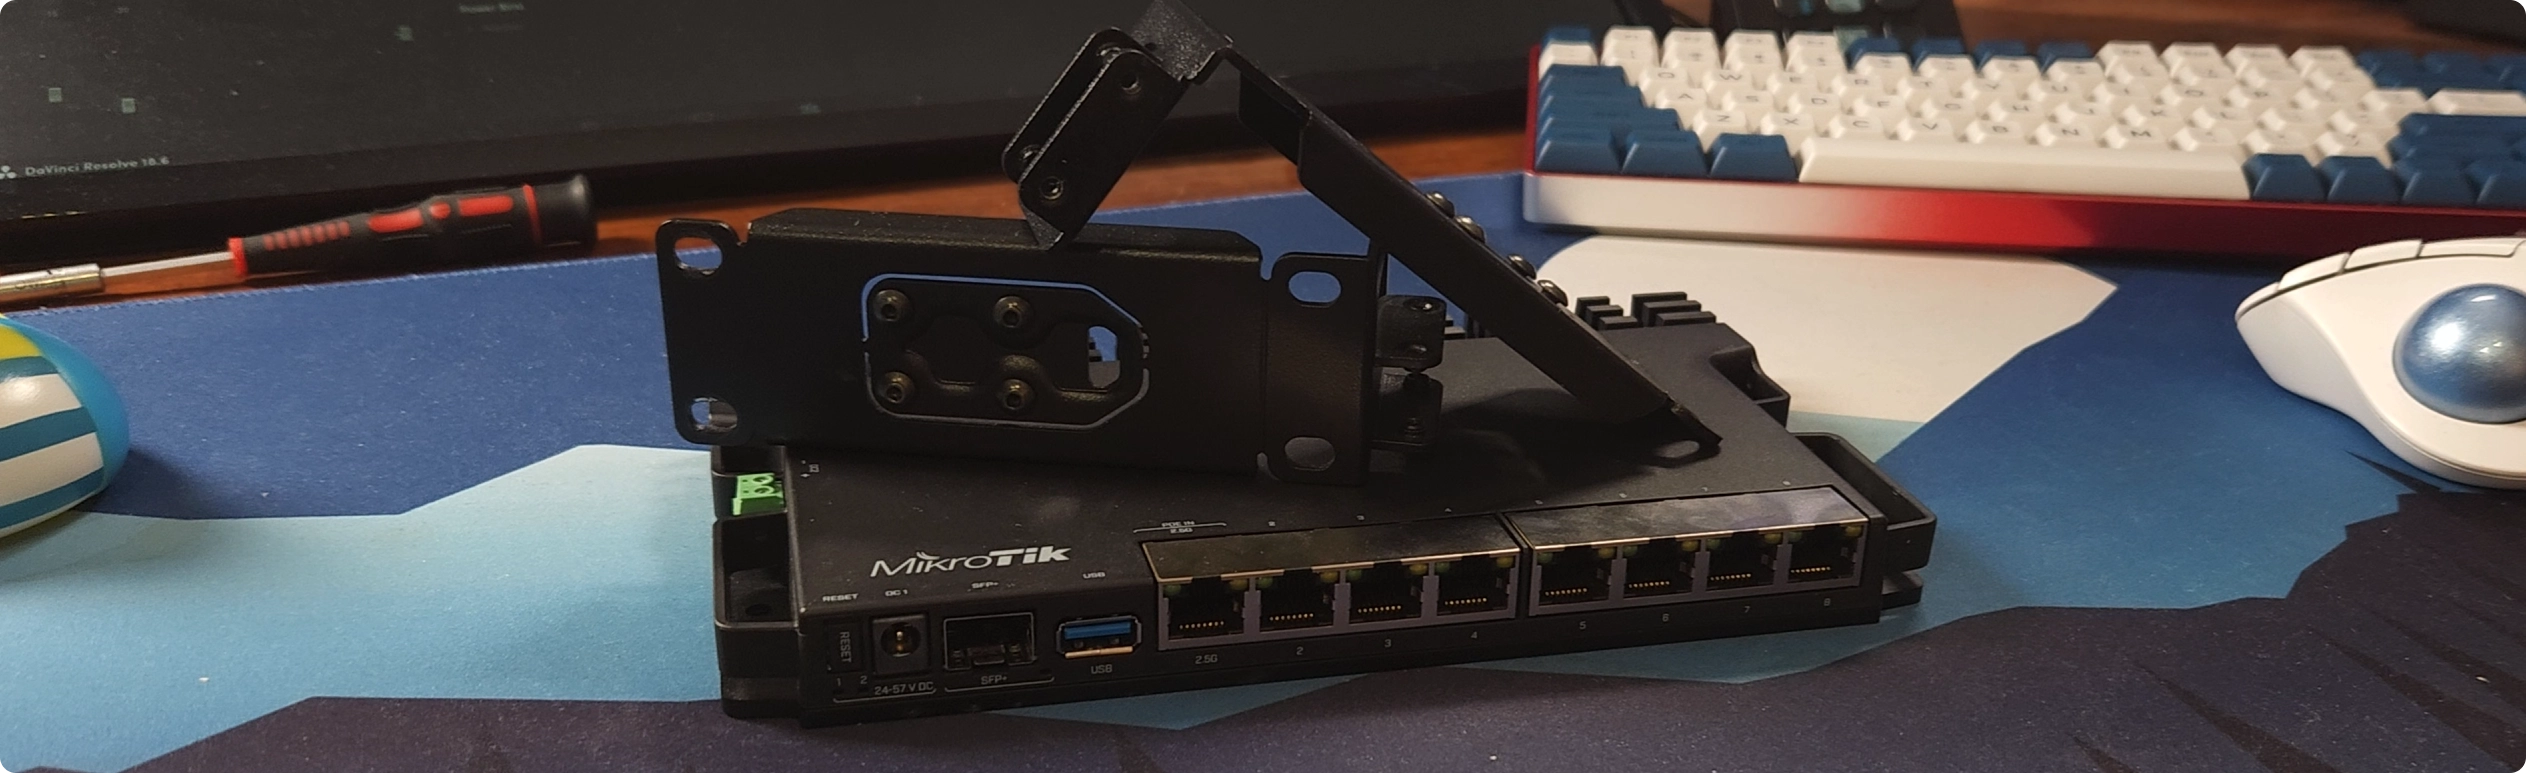 Mikrotik K-79 on top of the RB5009
If you’re feeling fancy, Mikrotik offers a rack mount kit called the K-79, letting you stack up to 4 of these babies in a single rack unit. Of course, I don’t need 4 routers in my homelab, but I still got one so I can nicely mount this one in my rack.
Now, let’s peek under the hood. We’re looking at a 64-bit quad-core ARM chip, chugging along at 1.4GHz. Plus, 1GB of RAM and 1GB of NAND storage – not too shabby for a routing platform!
❓ Why am I Upgrading?
Now, you might be wondering why I’m ditching my DIY setup for this Mikrotik. Well, hear me out. Sure, the old rig technically packs more punch on paper, but there are a few reasons I’m making the switch:
-
Cool, Quiet, and Efficient
The Mikrotik, being passively cooled, runs cool without making a peep - perfect for my bedroom rack setup. Unlike my noisy NAS, I can keep this one on 24/7.
-
Space Economy++
As time goes on and my rack slowly but surely fills up, I’m starting to take U-efficiency into consideration. Dedicating 2U of precious rack space just for a router feels a bit excessive.
Time to free up some room for other projects! It is also much easier to mount this to the back of my rack if I ever decide to do that, as it does not need rails in order to slide into the rack.
Update: by the time I finished up editing and writing this, I did end up moving all the networking to the back of the rack since I got yet more equipment and I needed to make room… I am not to be trusted with money
-
Automation Awesomeness
Mikrotik’s got some serious automation potential, at least compared to pfSense and OPNsensem, and it’s all thanks to the Terraform support. I’ve never been able to get my network automation quite right, but this time I’m hopeful I managed to find the right solution!
So yeah, while I could geek out over performance tests and power consumption stats, let’s keep it real – this upgrade is all about convenience and space-saving. I did not have any performance issues with my previous setup which I am aiming to fix here, nor did I consider the OPNsense box to be too power-hungry either. Don’t get me wrong, it wasn’t exactly sipping on Watts, but it wasn’t particularly problematic.
When planning out this blog and the associated video, I thought about running performance tests on both systems to compare them, so that there’s some substance to this and not just me rambling. I wanted to showcase the difference both in terms of power consumption and actual performance. Then I started actually working on this and I realized how silly that idea is. Let me explain.
⏱️ Performance
As a quick recap, my old router was a quad-core Intel i5 with 8Gb of RAM and a bunch of 1 gigabit interfaces. Any test I would run on it would be bottlenecked not by the performance of the system, but by my network being limited to 1 gigabit only.
Sure, the Mikrotik has a 2.5Gb and a 10Gb connection, but here’s the deal-breaker — I don’t have any other devices that can handle those speeds in my network (yet). So, those tests? Not happening.
And honestly, within my network, there’s not much traffic pushing past 1gb anyway. The heavy lifting happens mainly on the switchm as I am not routing any storage traffic or anything of the sort.
Even more, my internet speed caps out at 300 symmetrical, so there’s no real benefit to going beyond 1 GB even when it comes to uploading or downloading files.
Long story short? Performance-wise, both routers are in the same boat. It’s not about their horsepower, and it never really was — it’s about the network’s limits.
⚡ Power Consumption
Now that we’ve covered performance, let’s talk about Mr. James 🤓
As I already mentioned, I had plans to stress-test both systems and compare their power consumption to highlight Mikrotik’s efficiency.
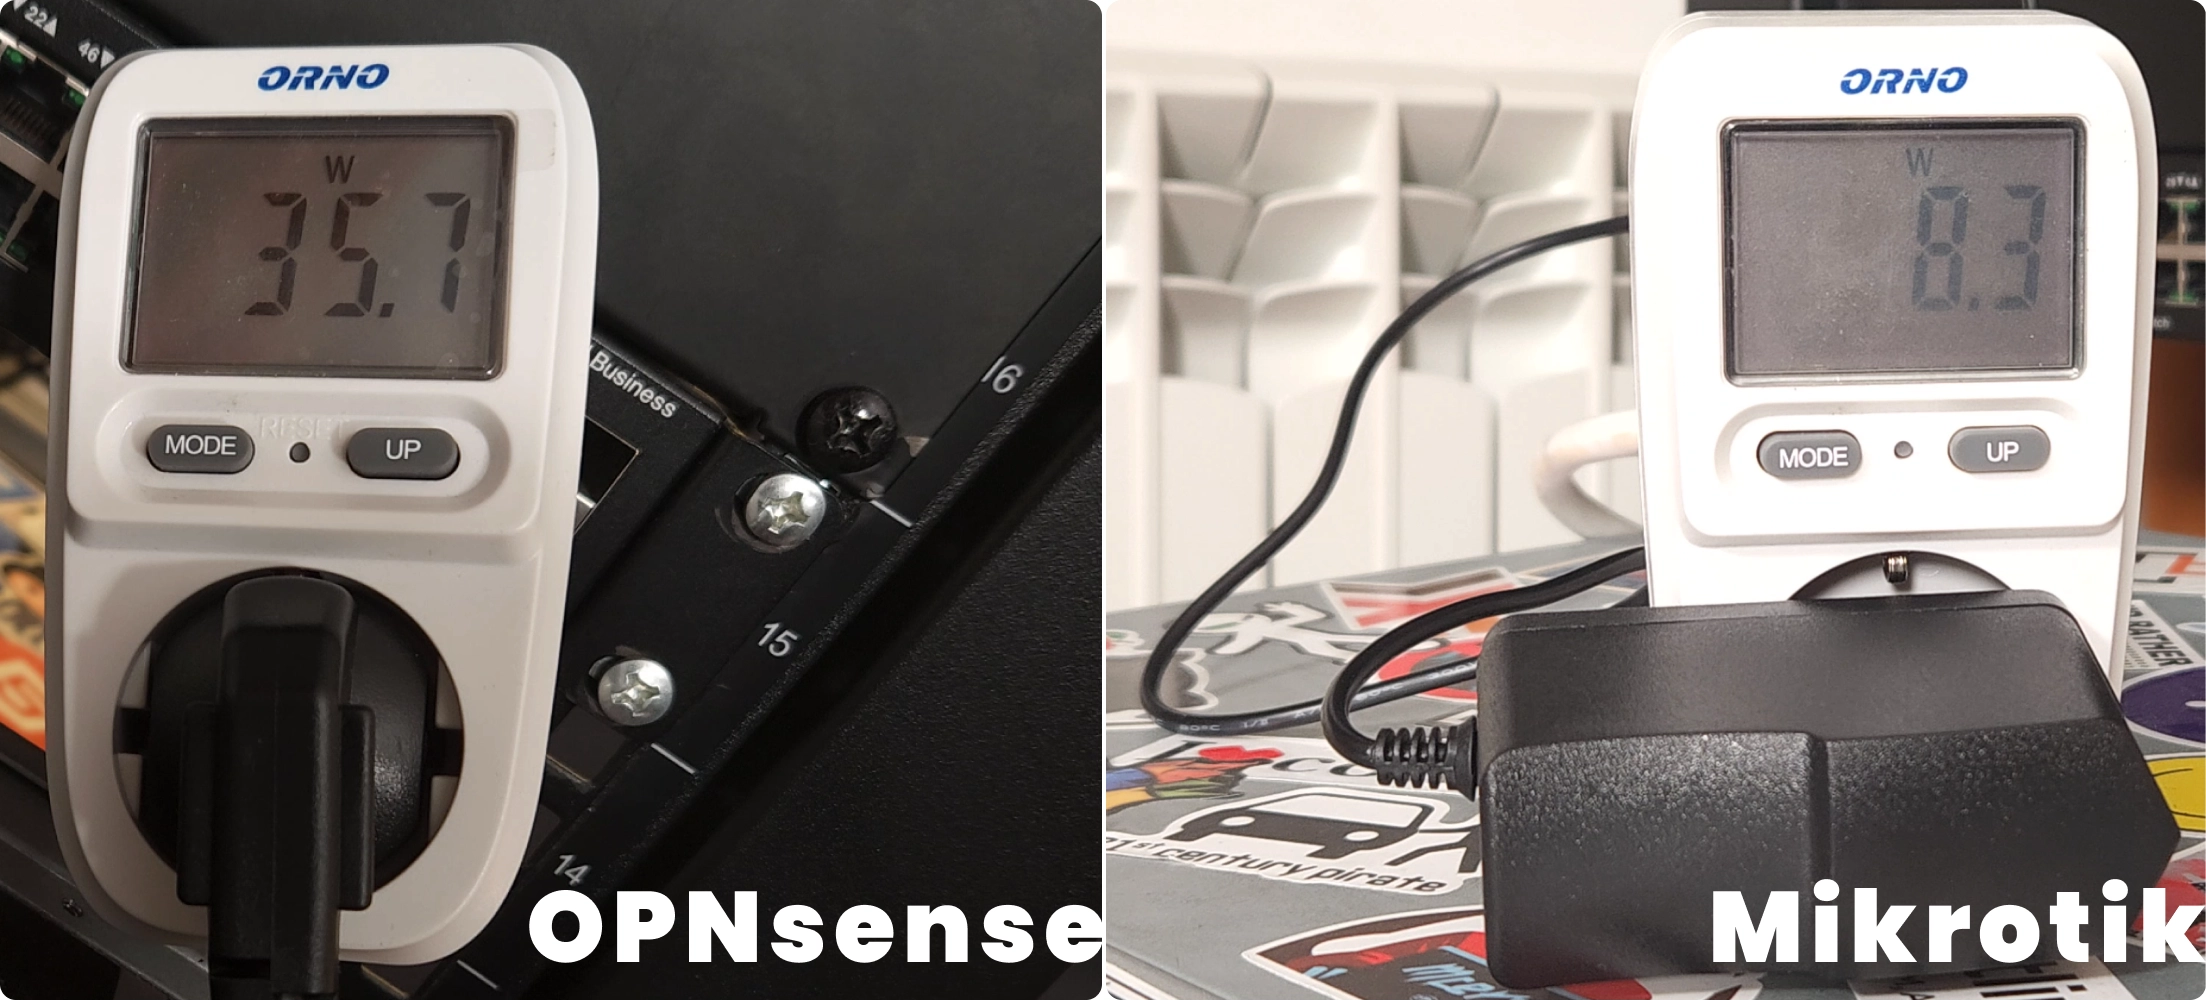 The OPNsense box, plugged into a Kill-A-Watt meter on the left, and the Mikrotik on the right, showcasing their power draw
Then, I hooked up my old router to a Kill-A-Watt meter, and boy oh boy, was I in for a surprise. Just by being plugged in (not even turned on), it was slurping up about 5 watts of power. During boot-up, that number skyrocketed to around 50 watts, before settling at a more modest 32-38 watts during idle.
In contrast, the new Mikrotik comes with a 12V 2A power supply, capping its maximum draw at 24 watts. Typically, it hovers around 8 watts during idle. So, you see, there’s not much point in putting them through the stress tests when the old router’s idle draw is a whopping ~50% higher than the new one’s max potential.
Oh, and a little disclaimer: those power consumption figures I mentioned? Well, the Mikrotik was hard at work, serving as my main router with 7 out of the 9 interfaces humming along (most bridged together in a makeshift switch, but still), while the old OPNsense box was just idling with nothing to do (no network cables plugged in).
With that said, let’s move on to the juicy stuff - the real reason I was itching to make this upgrade and hop aboard the Mikrotik train.
🤖 Automation
As I’ve been messing around - both in my homelab and in my professional work as a DevOps engineer - playing with all kinds of tech, I’ve really gotten into automation and GitOps. Here comes the main problem I am trying to solve with this problem, or one of them at least: OPNsense relies on this clunky XML file for its setup, and there’s no proper API to make tinkering with it a breeze.
Over the years, I’ve tried to get clever with Ansible, writing roles and playbooks to automate things. That, however, has always been a bit of a headache.
Some of the config changes would be picked up on the fly, yet most would not. I’d have to reboot my firewall when changes were made to the config for them to actually be picked up. And you know how lovely it is when your firewall is down and your internet access is gone…
Not to mention that messing with the insides of that XML file feels like performing open-heart surgery — I’m always worried about pulling the wrong lever and breaking the whole setup.
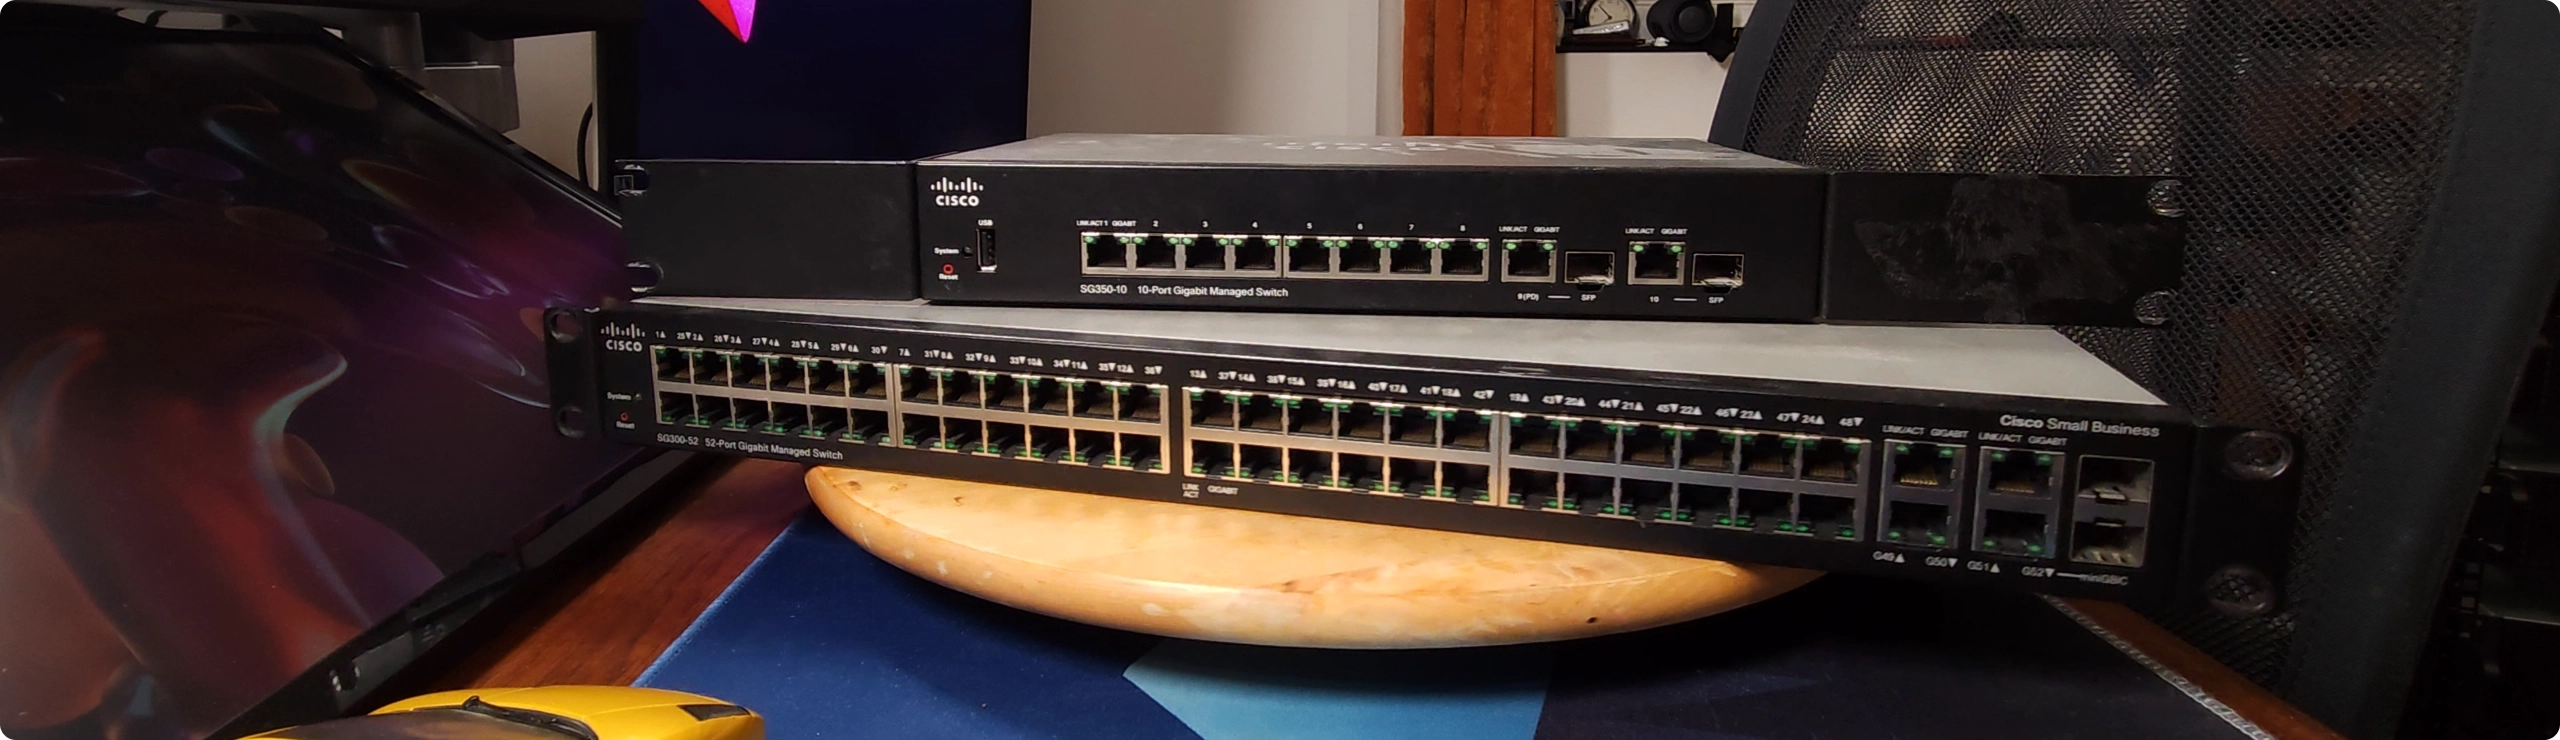 The Cisco SG350-10 on top of the SG300-52
Then there’s my Cisco gear… Oh, Cisco… Nobody ever got fired for buying Cisco, am I right?
I’ve got these SG300 and SG350 switches, but they’re not as automation-friendly as I’d hoped. They both support Cisco’s IOS, but only a limited version of it. The Ansible module that is available for them is a bit… meh. It really only allows me to send CLI commands to the devices and that’s about it. No idempotence or anything at all. I’d have to implement that myself!
Now don’t get me wrong. If you do shell out for proper Cisco gear, there are actually good modules out there for network automation. I, however, refuse to get an old Catalyst that’s both loud and power-hungry to gain access to those features.
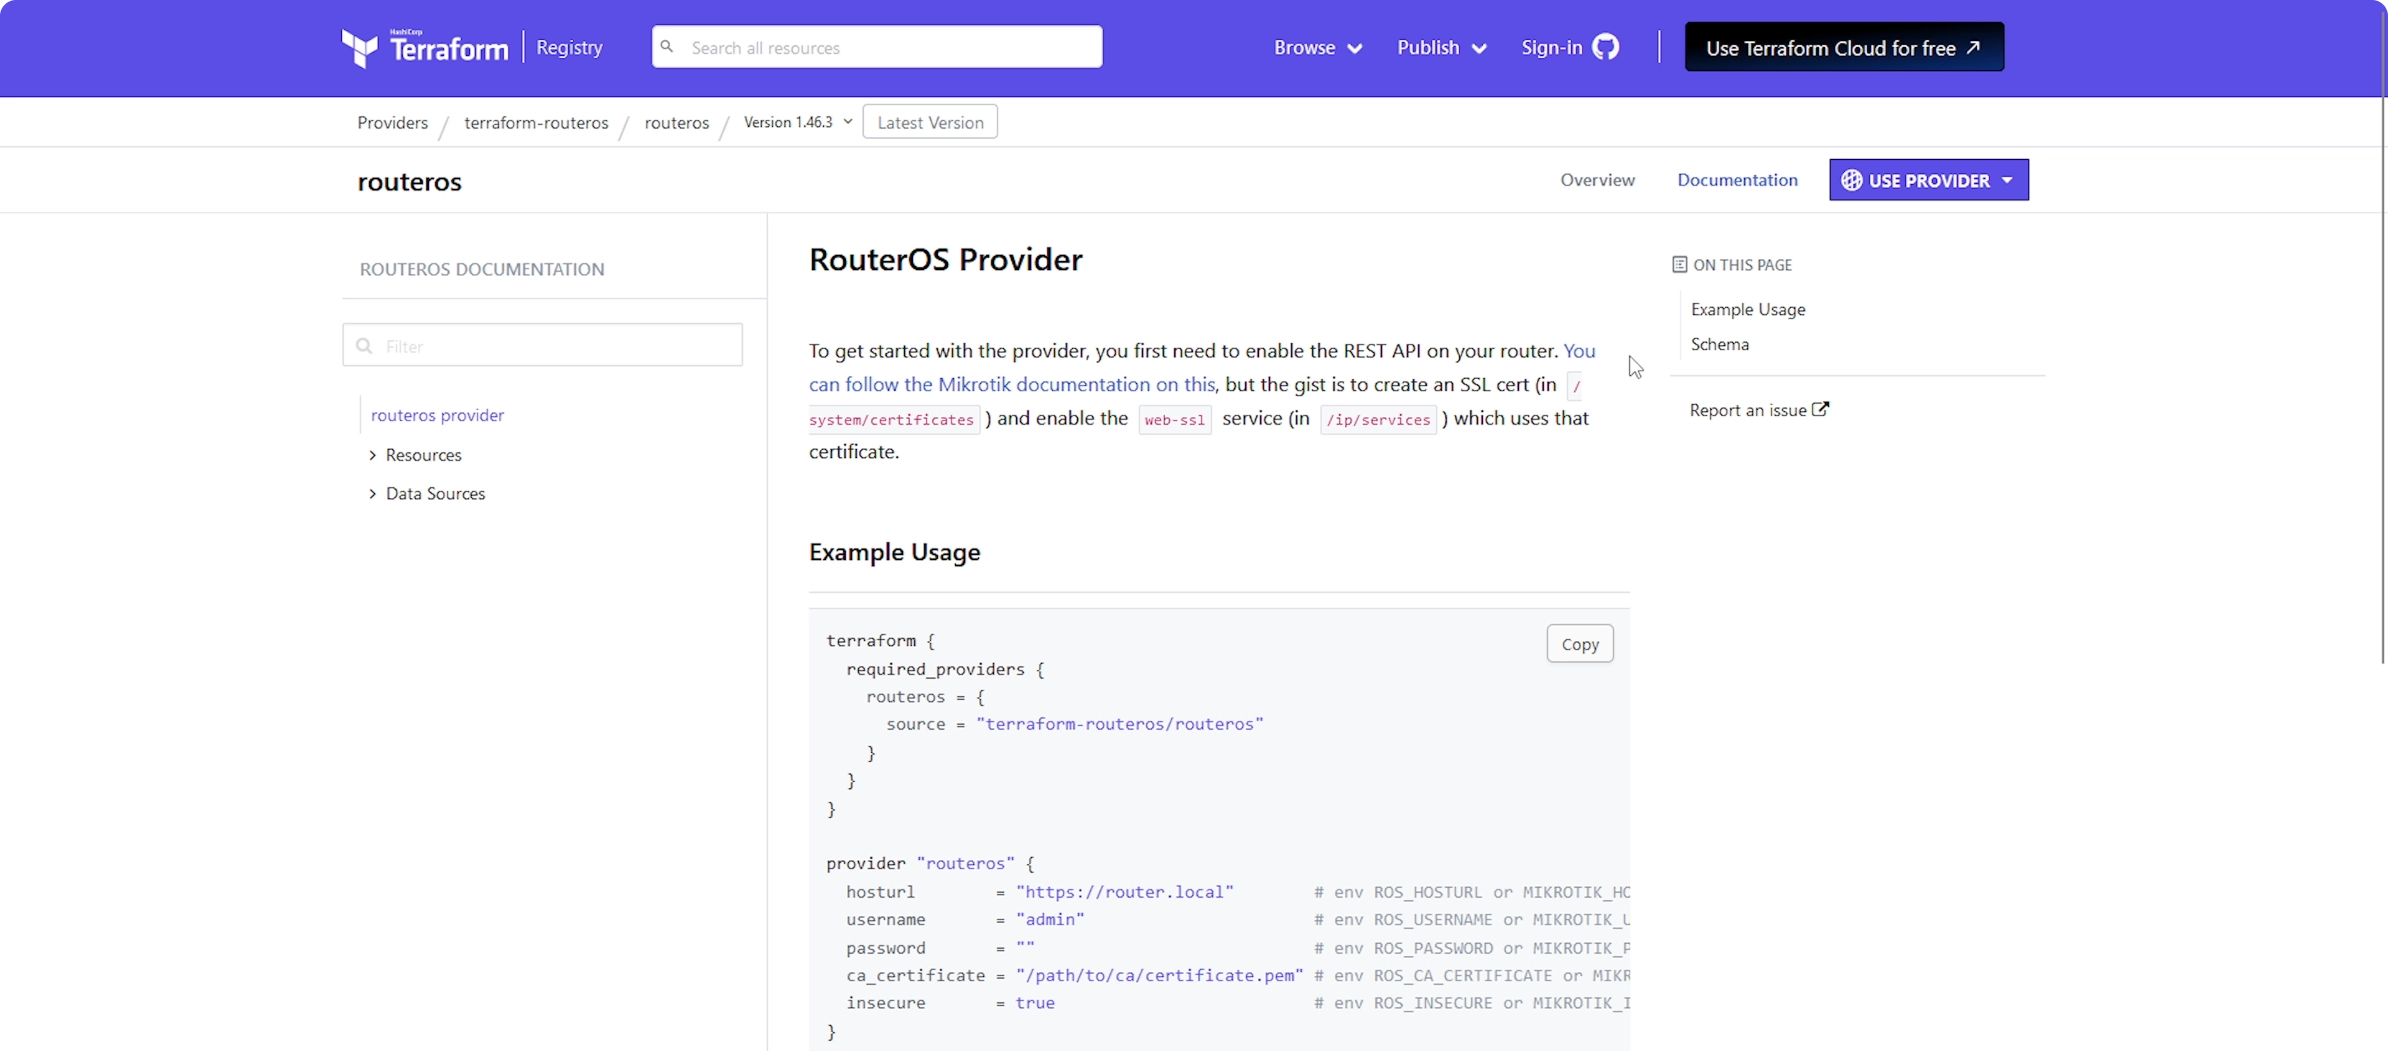 The RouterOS Provider Page on https://registry.terraform.io
Relatively recently, I stumbled upon something interesting: a Terraform provider for Mikrotik. And since Terraform plays nice with my GitOps setup, I thought, “Why not give it a whirl?”. Thus, here I am, testing the waters!
The good news are that it seems fairly extensive and it covers all functionalities I am intereste in. The bad news is that it only supports RouterOS and not SwitchOS. This is obviously not a problem for my router, but it may be problematic when it comes to switches.
Mikrotik’s switch offering consists of 2 main lines:
- the C.R.S. -> Cloud Router Switch -> can boot into either RouterOS or SwOS
- the C.S.S. -> Cloud Smart Switch -> can only boot into SwOS
Thus, I absolutely need a CRS device to make this work. Can you guess which model is more expensive? 🥲
If I can get this Mikrotik device automated to the extent I want to, I will probably (surely) upgrade my access points and switches to Mikrotik as well to complete the setup.
⚙️ Default Configuration
 The Mikrotik, mounted into the rack
In this blog post, we’re not diving deep into the nitty-gritty of Terraform code and configuration. Consider it more of an unboxing, overview, and a bit of a venting session. I’ve already got the ball rolling on the next part of this mini-series, where I’ll walk you through the initial setup steps.
To manage our Mikrotik device, we have 3 options available: the WebUI, WinBox and SSH. I am not really knowledgeable enough with the Mikrotik CLI to go for SSH, so I’ll just pick WinBox. It is an executable you can download from Mikrotik’s download page.
 The default configuration present on the Mikrotik
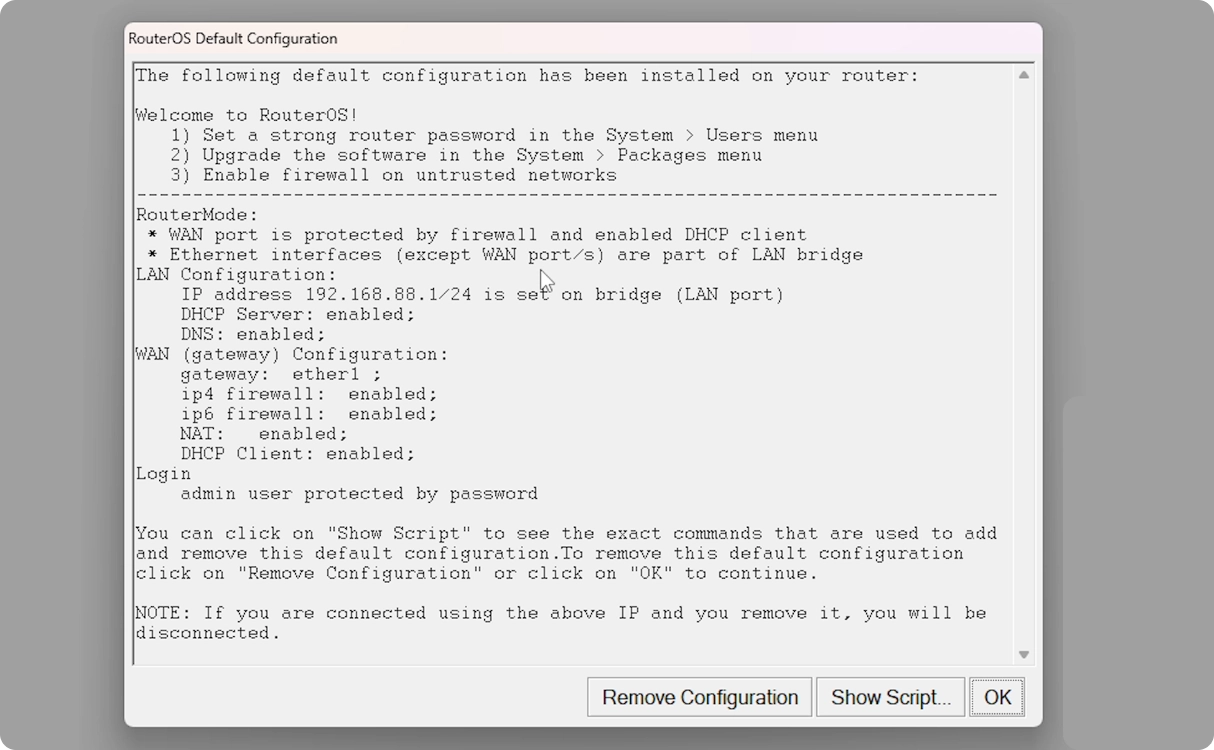
By default, we don’t hhave much configured, but it’s just enough to get us online safely. When we first log in to our new Mikrotik router we will be greeted to a message informing us what the default configuration is.
Here, you can see that for our WAN we have:
- IPv4 and IPv6 firewall enabled,
- a DHCP client enabled,
- it isbound to the
ether1interface, - NAT enabled
As far as our LAN is concernedm, we get:
- the default IP address of 192.168.88.1, with a netmask of /24 (so 192.168.88.1-192.168.88.255)
- a DHCP server enabled
- DNS enabled
I have plugged my uplink in the first port, and then I am using all of the other ports as a makeshift switch, until I get a new one. The plan is to use the old Cisco SG350-10 as a dumb management switch, to separate all of the admin interfaces for things like TrueNAS, Proxmox and so on. I haven’t configured that in this post since we will set that up using Terraform in a following one.
For now, all devices are in the LAN network, with my AP being plugged in the 2nd port, my HomeAssistant box in the 6th, my Cisco switch in the 7th and my desktop in the last one.
 The default DHCP server configuration
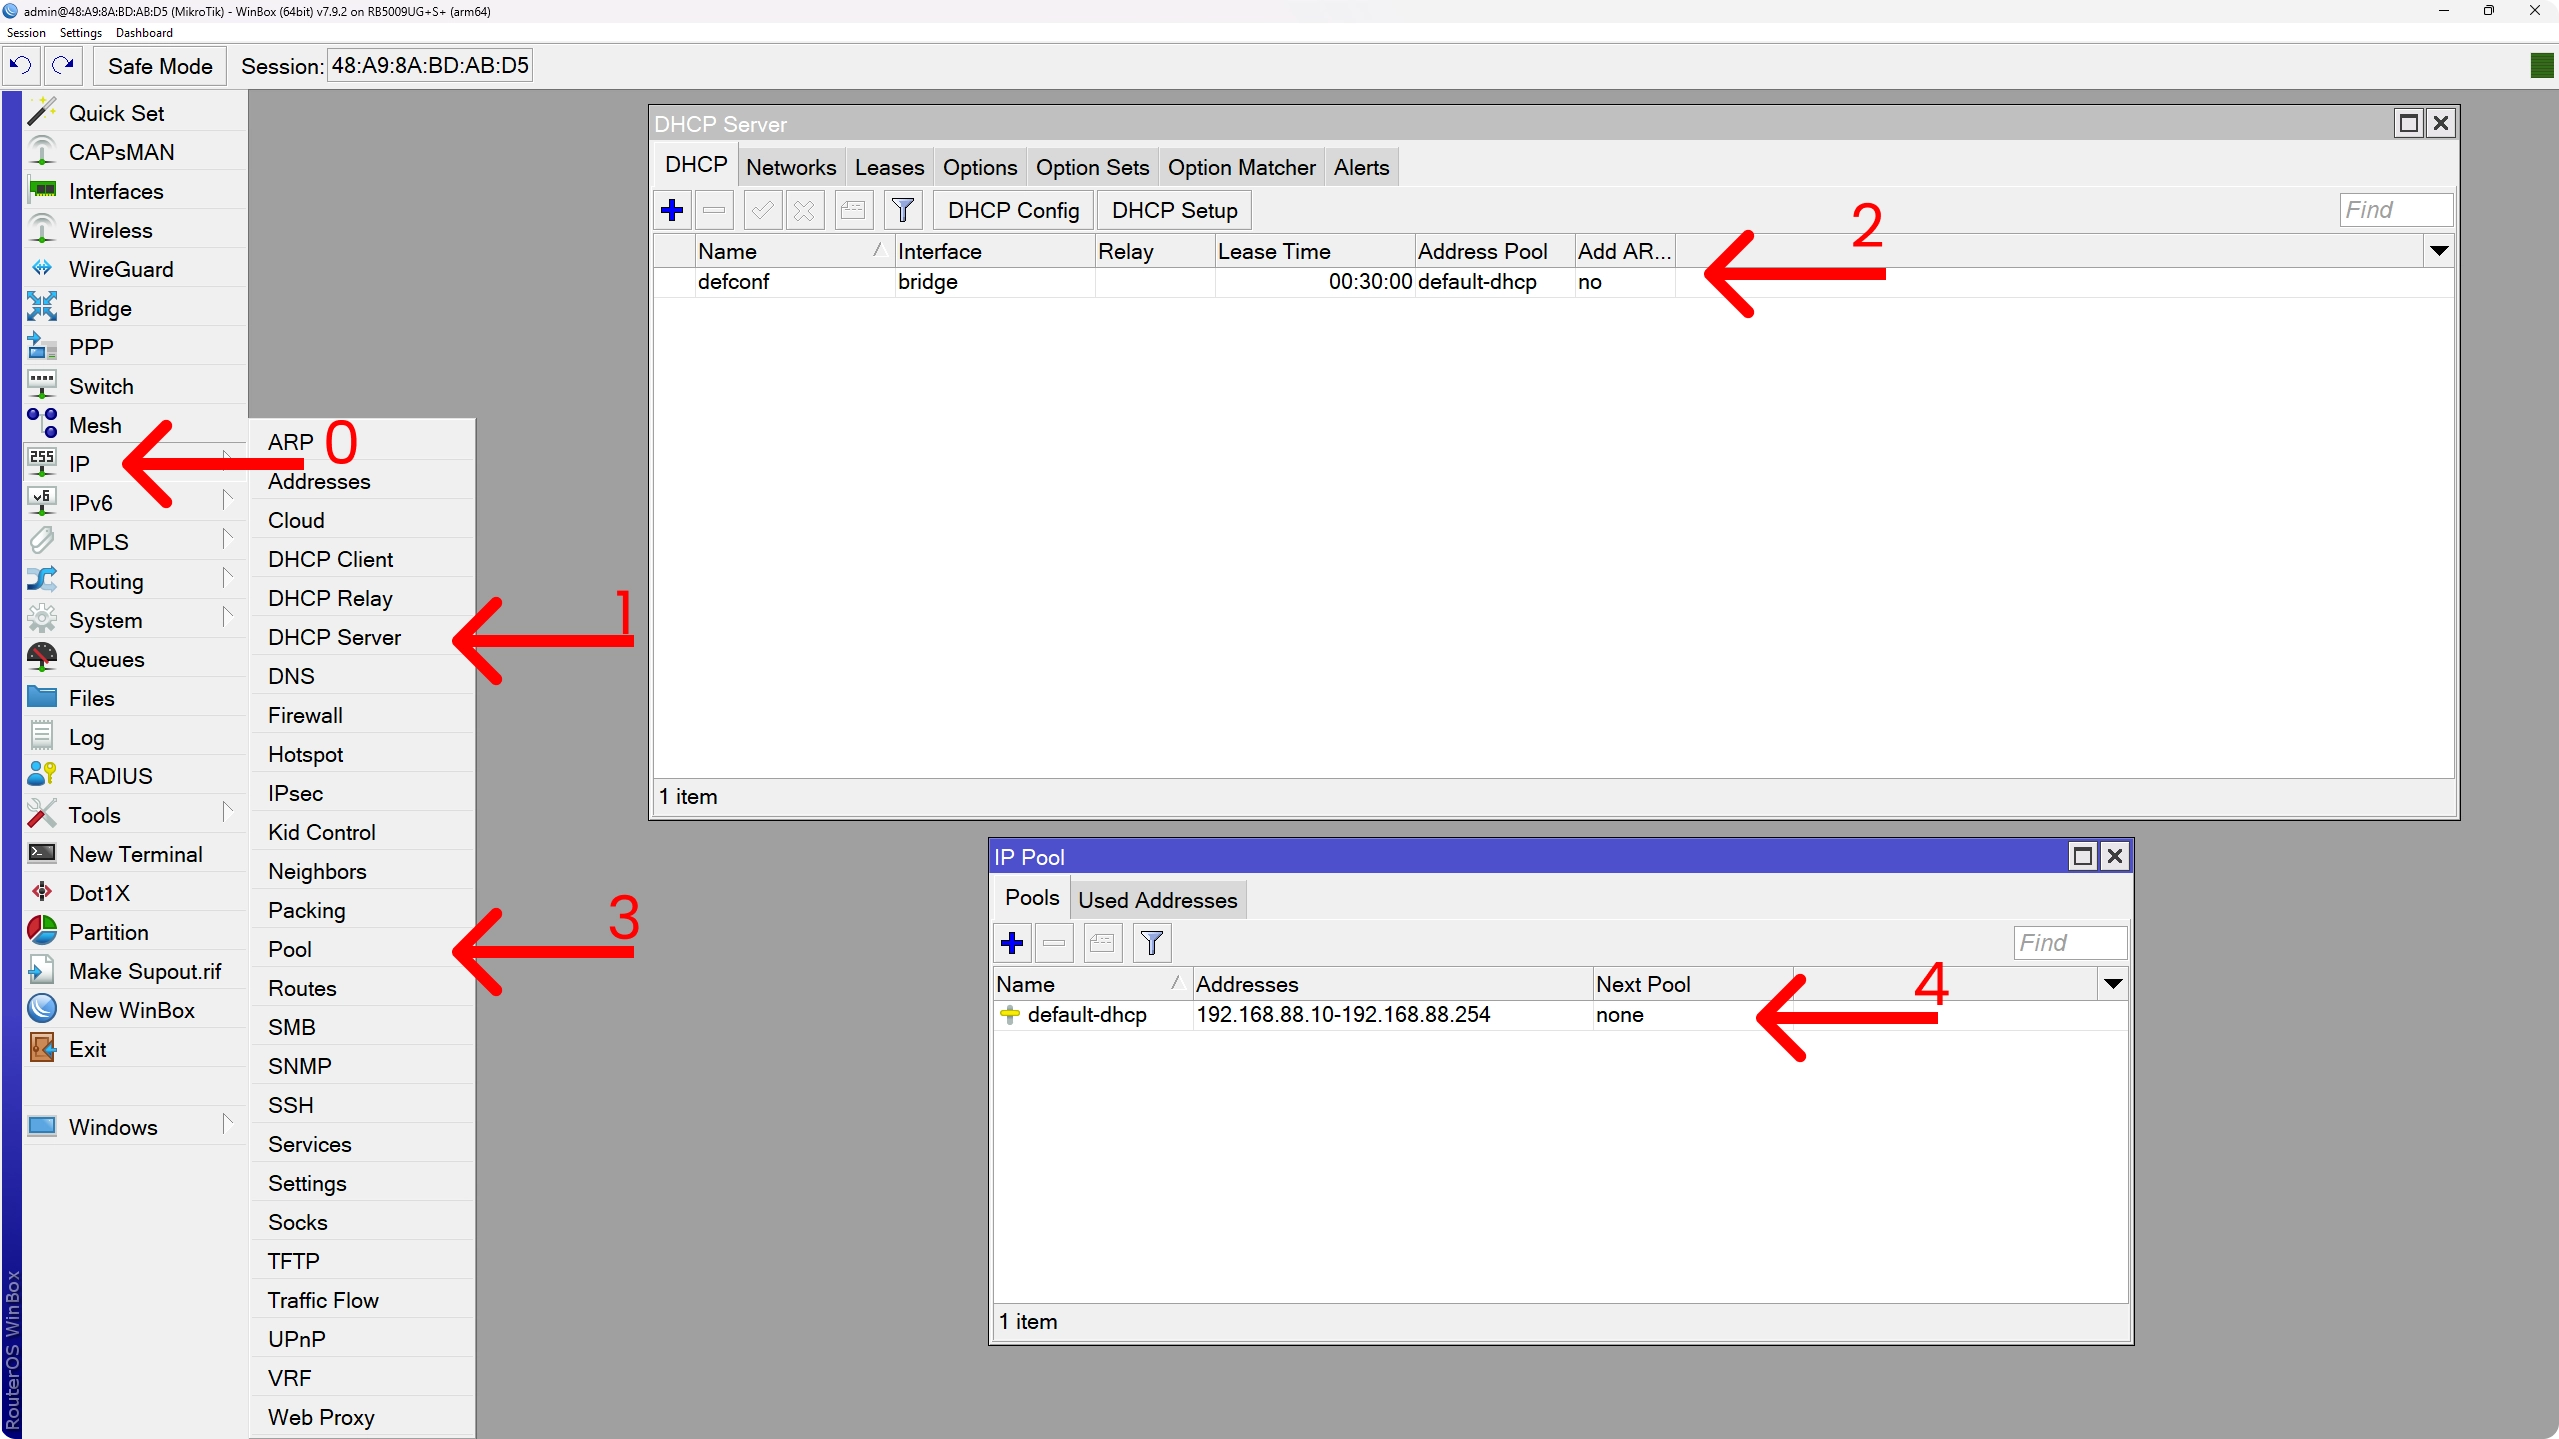
Digging in just a bit deeper in the default config, we can navigate to IP > DHCP Server. Here we will find our default DHCP server configuration. We can see it is bound to the bridge network, so that will be our LAN, and that it is serving out addresses from an IP address pool called default-dhcp.
To find out what that IP Address Pool actually is, we need to go to IP > Pool and here we can see our default-dhcp pool being 192.168.88.10 - 192.168.88.254.
However, if I open up a local terminal on my machine and check out what my IP address is, you’ll see it’s actually closer to that .254 than to the .10. That is because Mikrotik parses this list backwards by default, or at least that is what I understand and what I found online.
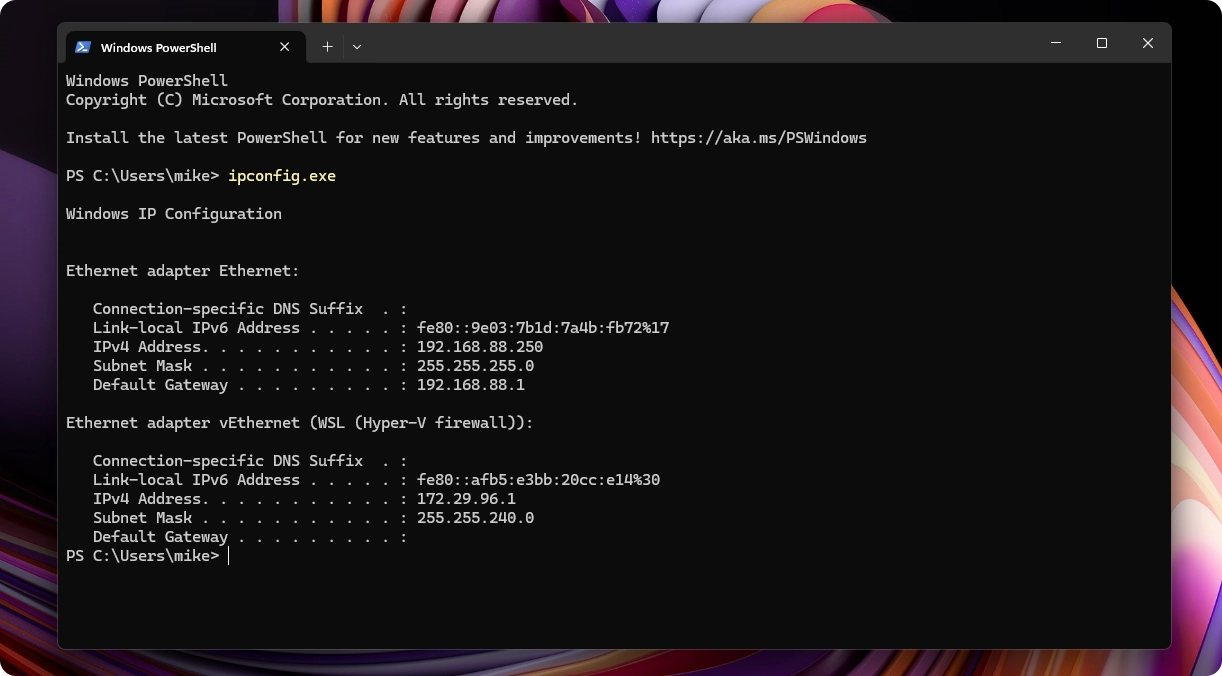 The IP address of my workstation, as served by the DHCP server
To check out the default firewall rules by navigating to IP > Firewall:
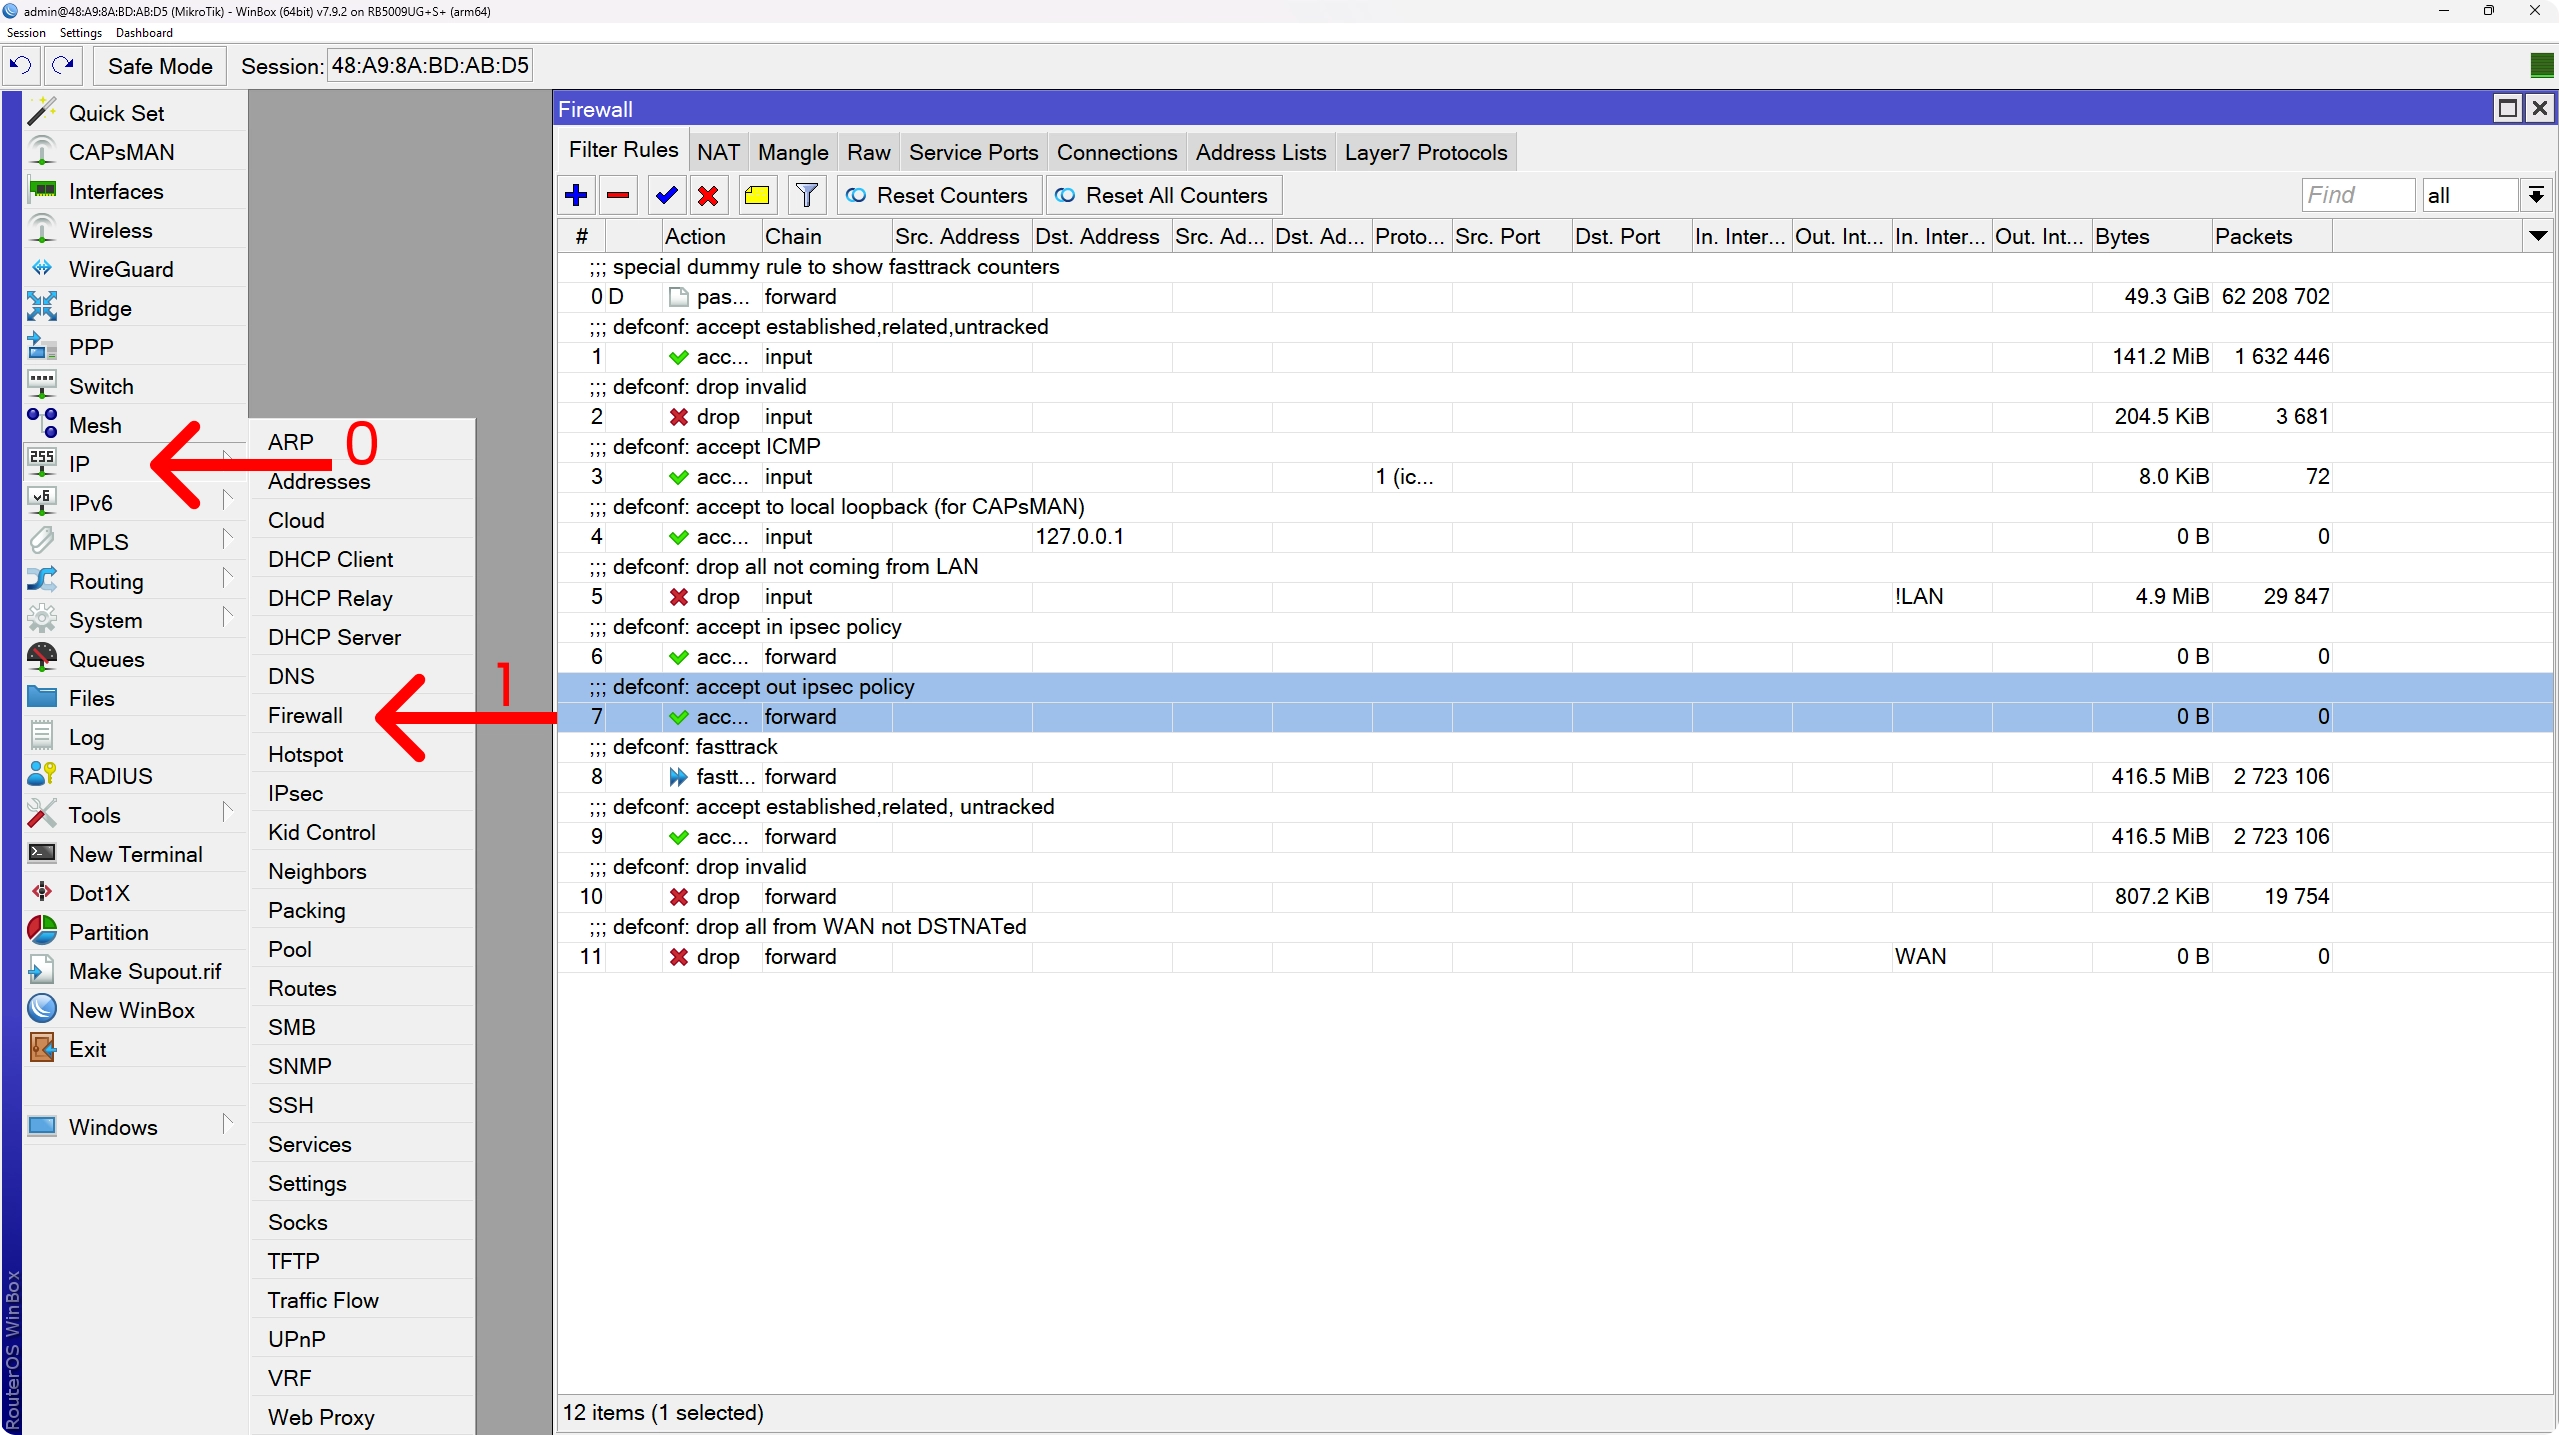 The default firewall rules
To take a look at the entire configuration present on the device, we can run the export command:
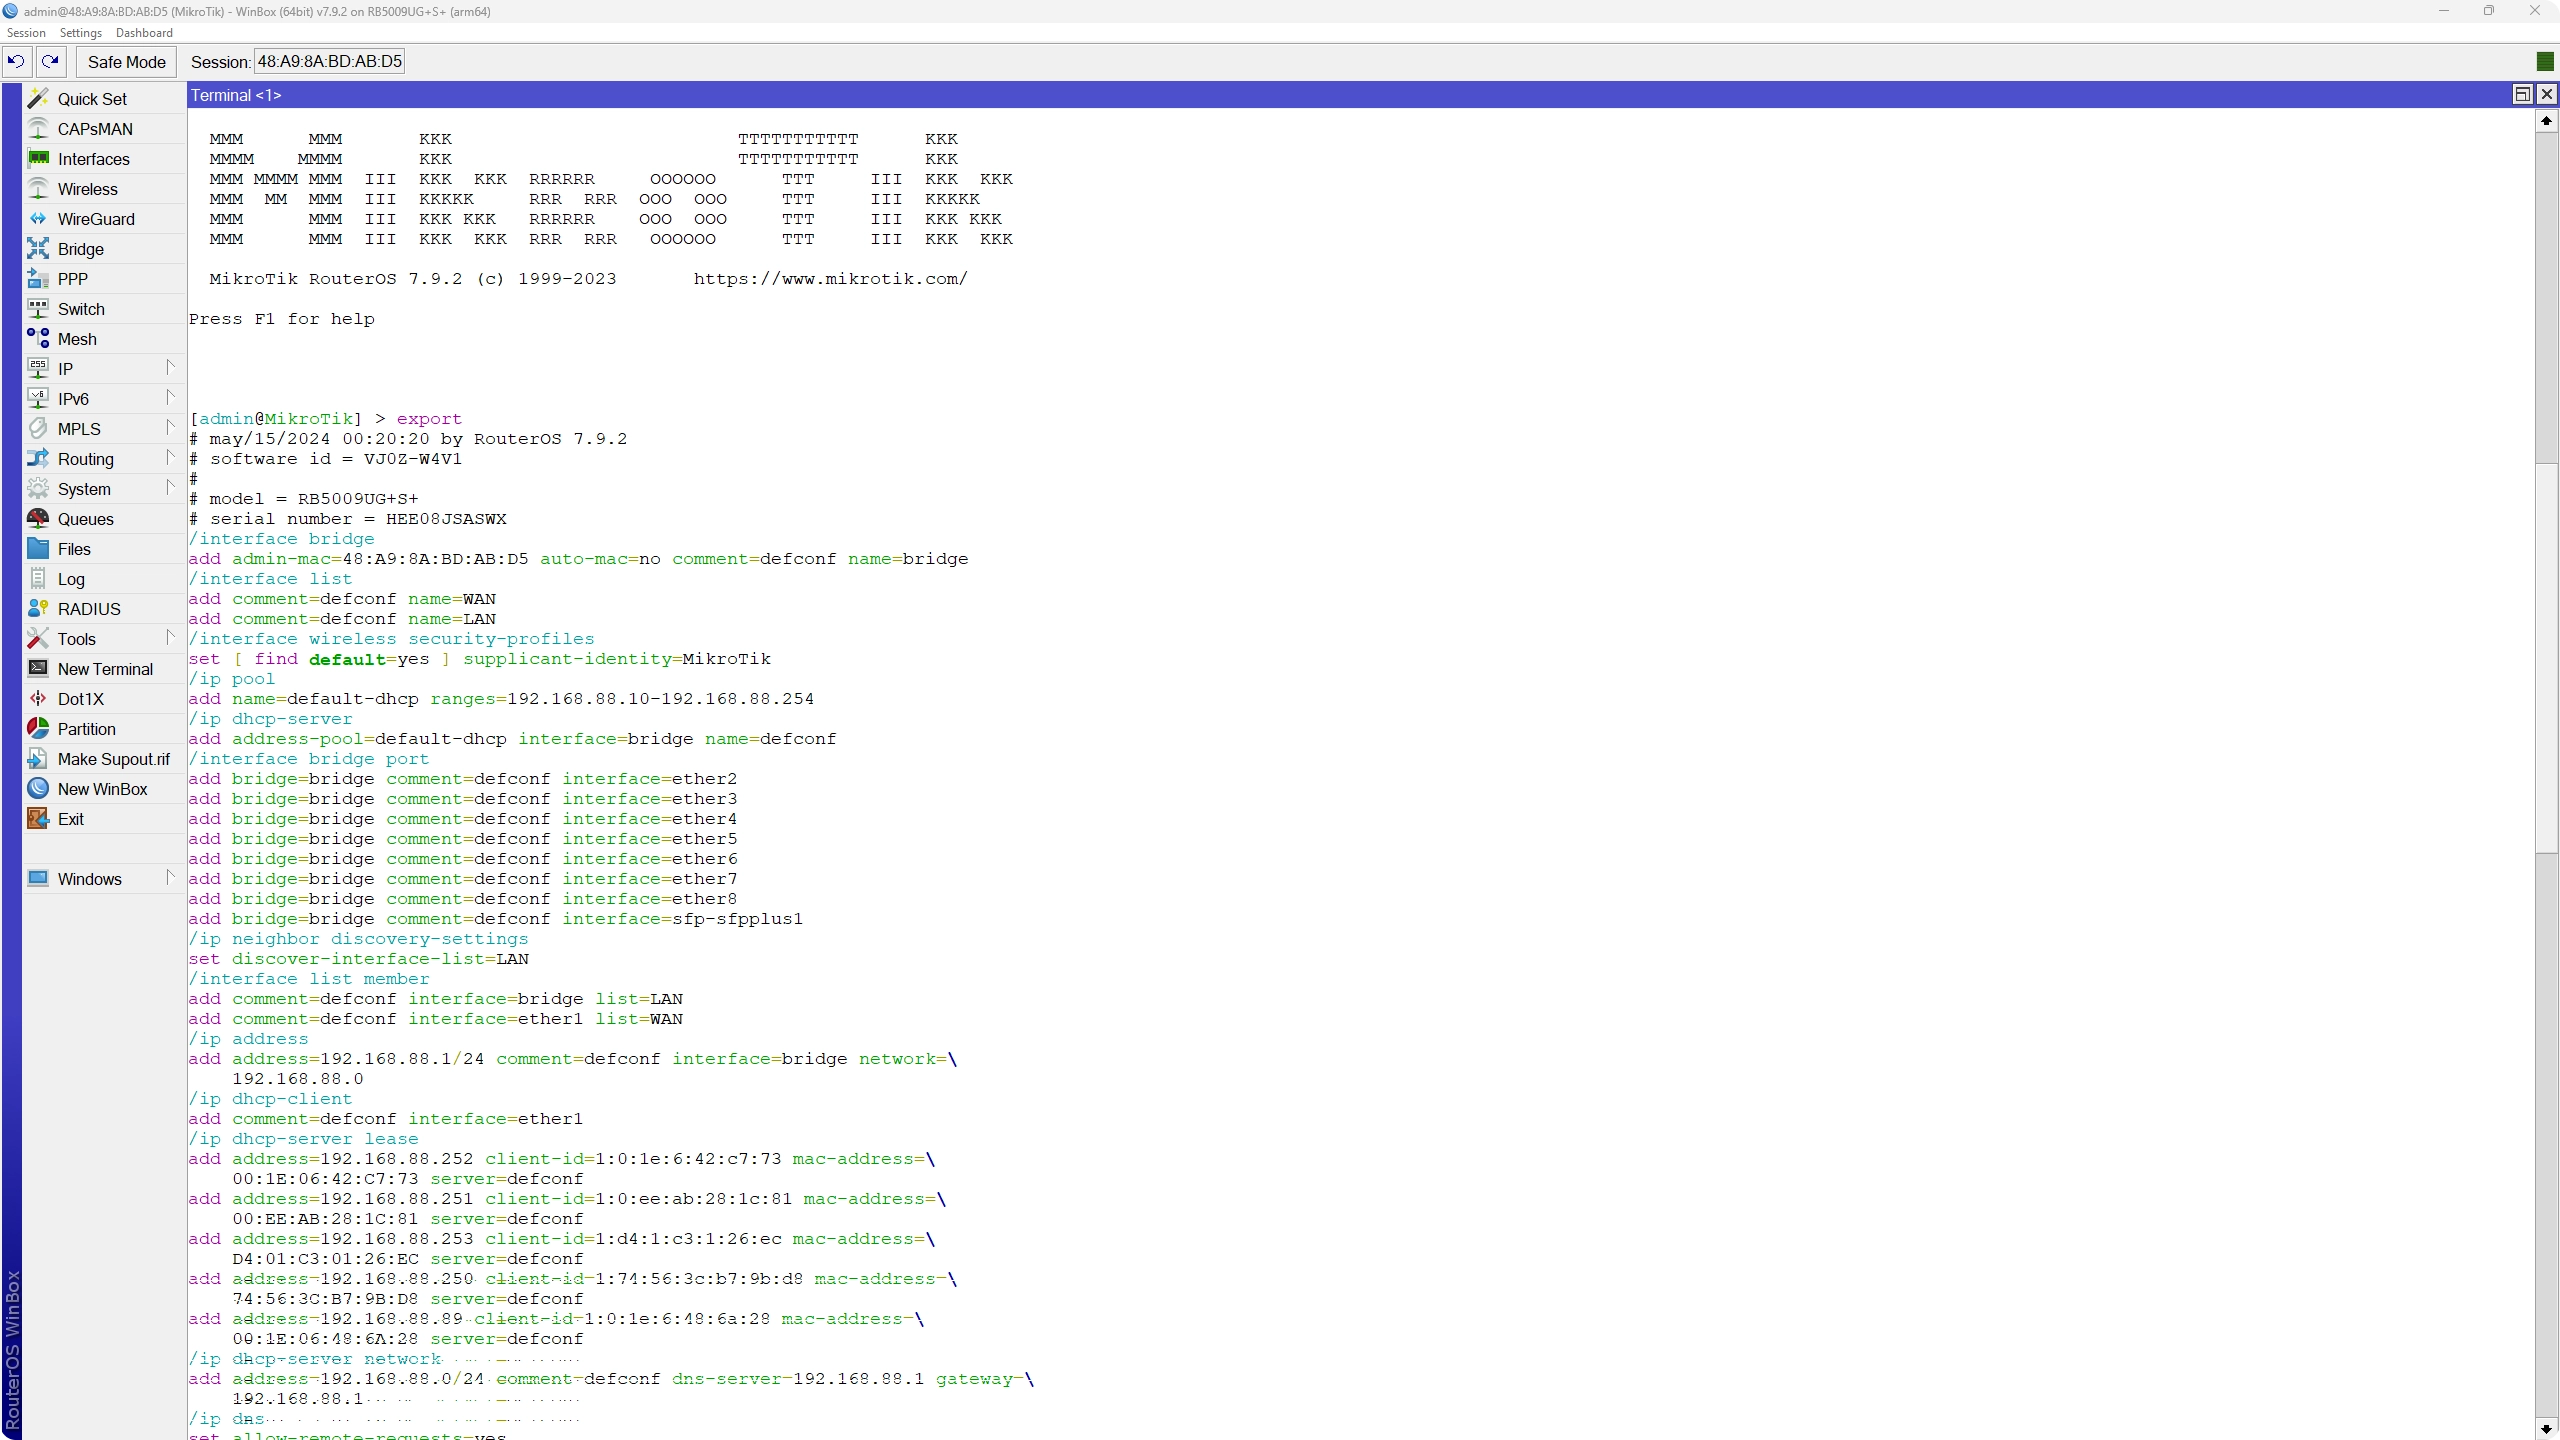 The default configuration, exported
☁️ Final Thoughts
And there you have it! We’ve unboxed the Mikrotik, talked about why I made the switch and got the device mounted into the rack. Next up, we’ll dive into setting up automation with Terraform. So stay tuned!
Thanks for hanging out, and catch you in the next one! Cheers 👋