Getting Started With Mikrotik and Terraform
Oboard a brand-new Mikrotik device under Terraform for Infrastructure as Code.
I “recently” (like… almost a year ago at this point 😅) upgraded from my DIY OPNsense setup to a MikroTik RB5009. You can watch my YouTube Video for the full story of the why, what and the how.
After much ado and months of procrastination, I’m finally getting started with my Terraform-Mikrotik network automation. This post will not be a full-blown guide or walk-through. Rather, I am just aiming to show you how to:
- Connect Terraform to Mikrotik,
- Import the default Mikrotik configuration that comes with my RB5009 into Terraform,
- Make the least amount of changes necessary to get internet access.
This might not seem like much, but the aim is to set up a solid base for my network automation going forward. At the end of this post (hopefully), my entire Mikrotik router will be terraform-managed!
I should mention that I’m completely new to MikroTik devices. This RB5009 is more or less my first one (I had a CSS switch a while ago but that’s not “managed”)! I’m learning how to manage it as I go along, so if you’re also new to MikroTik, I hope you’ll find this especially helpful since I’ll be explaining things from a beginner’s perspective rather than assuming much prior knowledge.
Prerequisites
If you want to follow along you don’t really need much for this one:
A MikroTik router
I am using my RB5009, but realistically, any RouterOS device will do. Be advised, however, that if you are using a different device you will likely have to edit the commands and snippets I’m sharing here since our default configs will be different.
With that being said, the operations and concepts should still be applicable.Terraform CLI installed on your machine
You can follow the official installation guide or use whatever package manager you fancy. For this tutorial, I will once more be using
miseto manage my dev tools: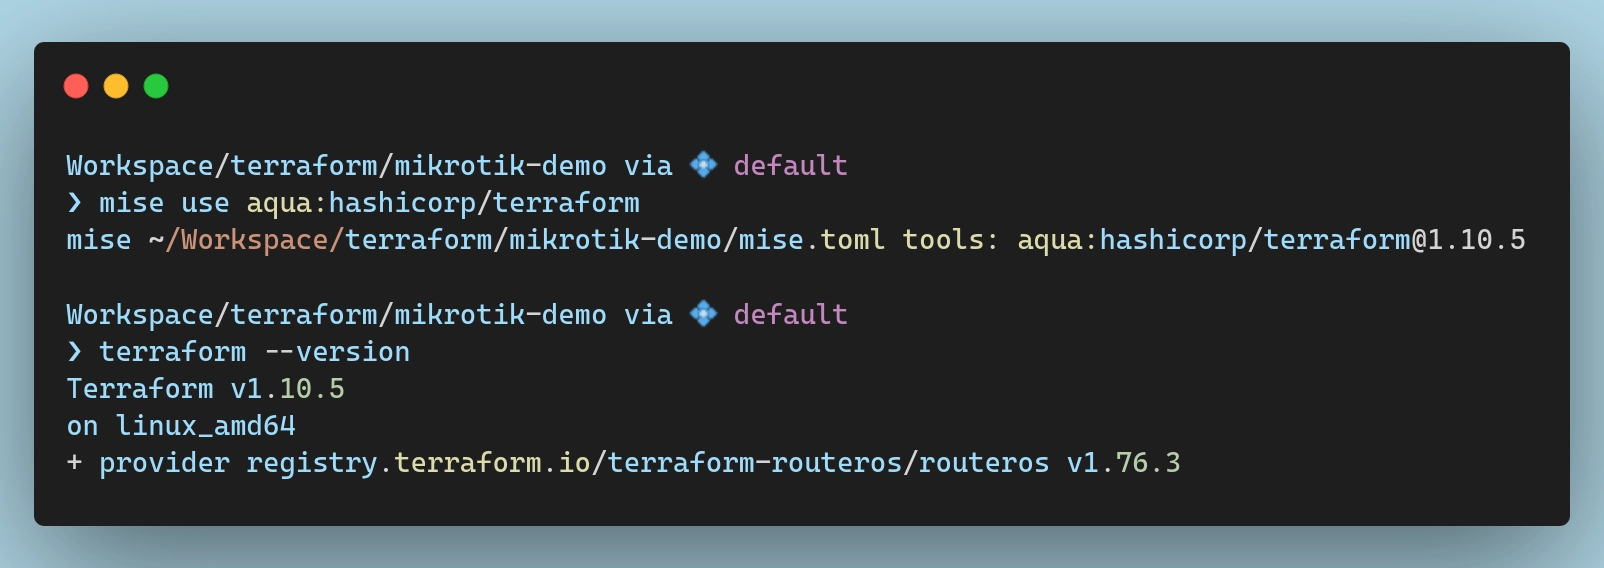 Installing terraform via
 mise
Connecting Terraform to Mikrotik
Provider Setup
The provider I’m going to use is terraform-routeros. I will install the latest version which, at the time of writing, is 1.76.3. To do that, I typically create a providers.tf file in the root of my project and configure the required_providers block there:
| |
With that in place, I can now initialize the workspace to pull down the provider and install it:
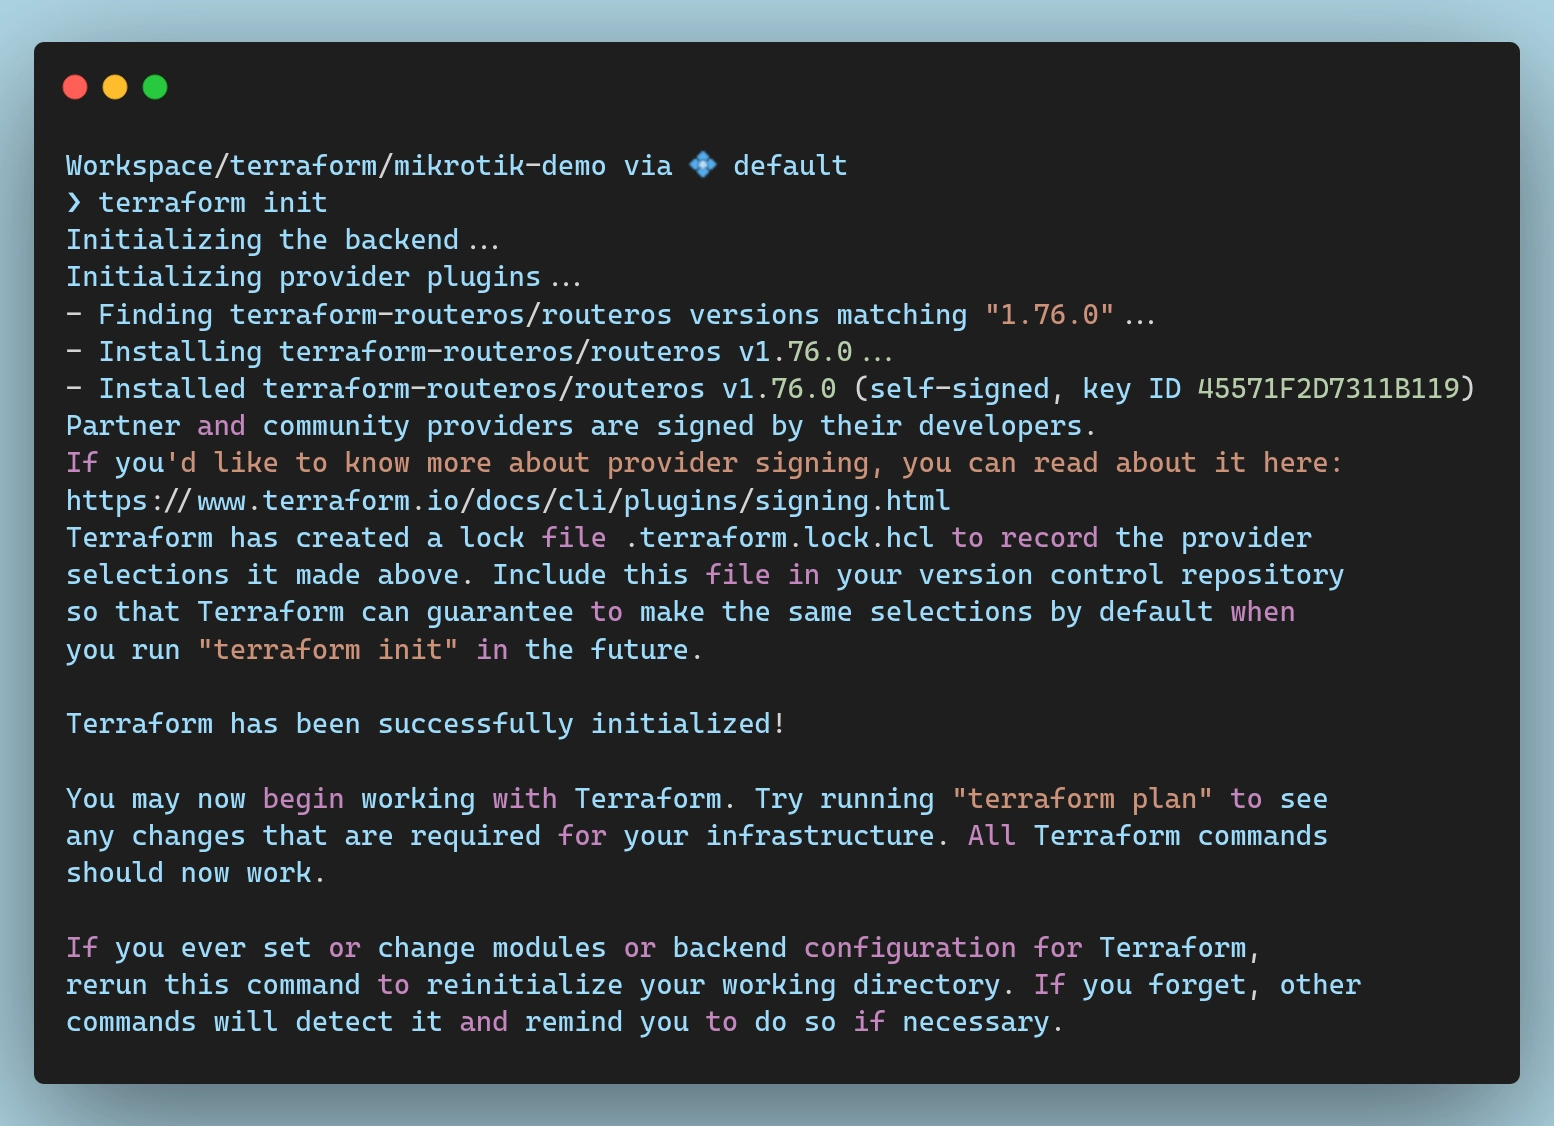 Initializing the Terraform workspace
Provider Configuration
By default, Mikrotik routers use an IP of
192.168.88.1and a username ofadmin. Depending on your model, the password might be blank or it might be randomized. If it’s blank, well… you’ll know. If it’s randomized, it will be written on your device, on the label next to the serial number and whatnot. {.prompt-info}
With the provider installed, I need to configure it to tell it how it can connect to my router to manage it. It needs to know the IP address and the credentials to authenticate against the RouterOS API.
This is done by adding a provider block with the required parameters which you can find in the official documentation of the provider. I typically dump that config in my providers.tf file as well:
| |
You can see here that I defined variables for all these connection parameters instead of hardcoding them in. You can do that if you want to (put your credentials in there), but I don’t really recommend to, especially if you intend to push this code to git eventually.
To be able to use these variables, I need to first define them:
| |
And now I need to tell terraform what the values for these variables actually are. I typically create a credentials.auto.tfvars file and make sure to gitignore it:
| |
While you can continue using the
adminuser, it is best practice to log in and create a dedicated user for terraform. {.prompt-tip}
Validating the Connection
At this point everything should be all set up and ready to go… Or so I thought.
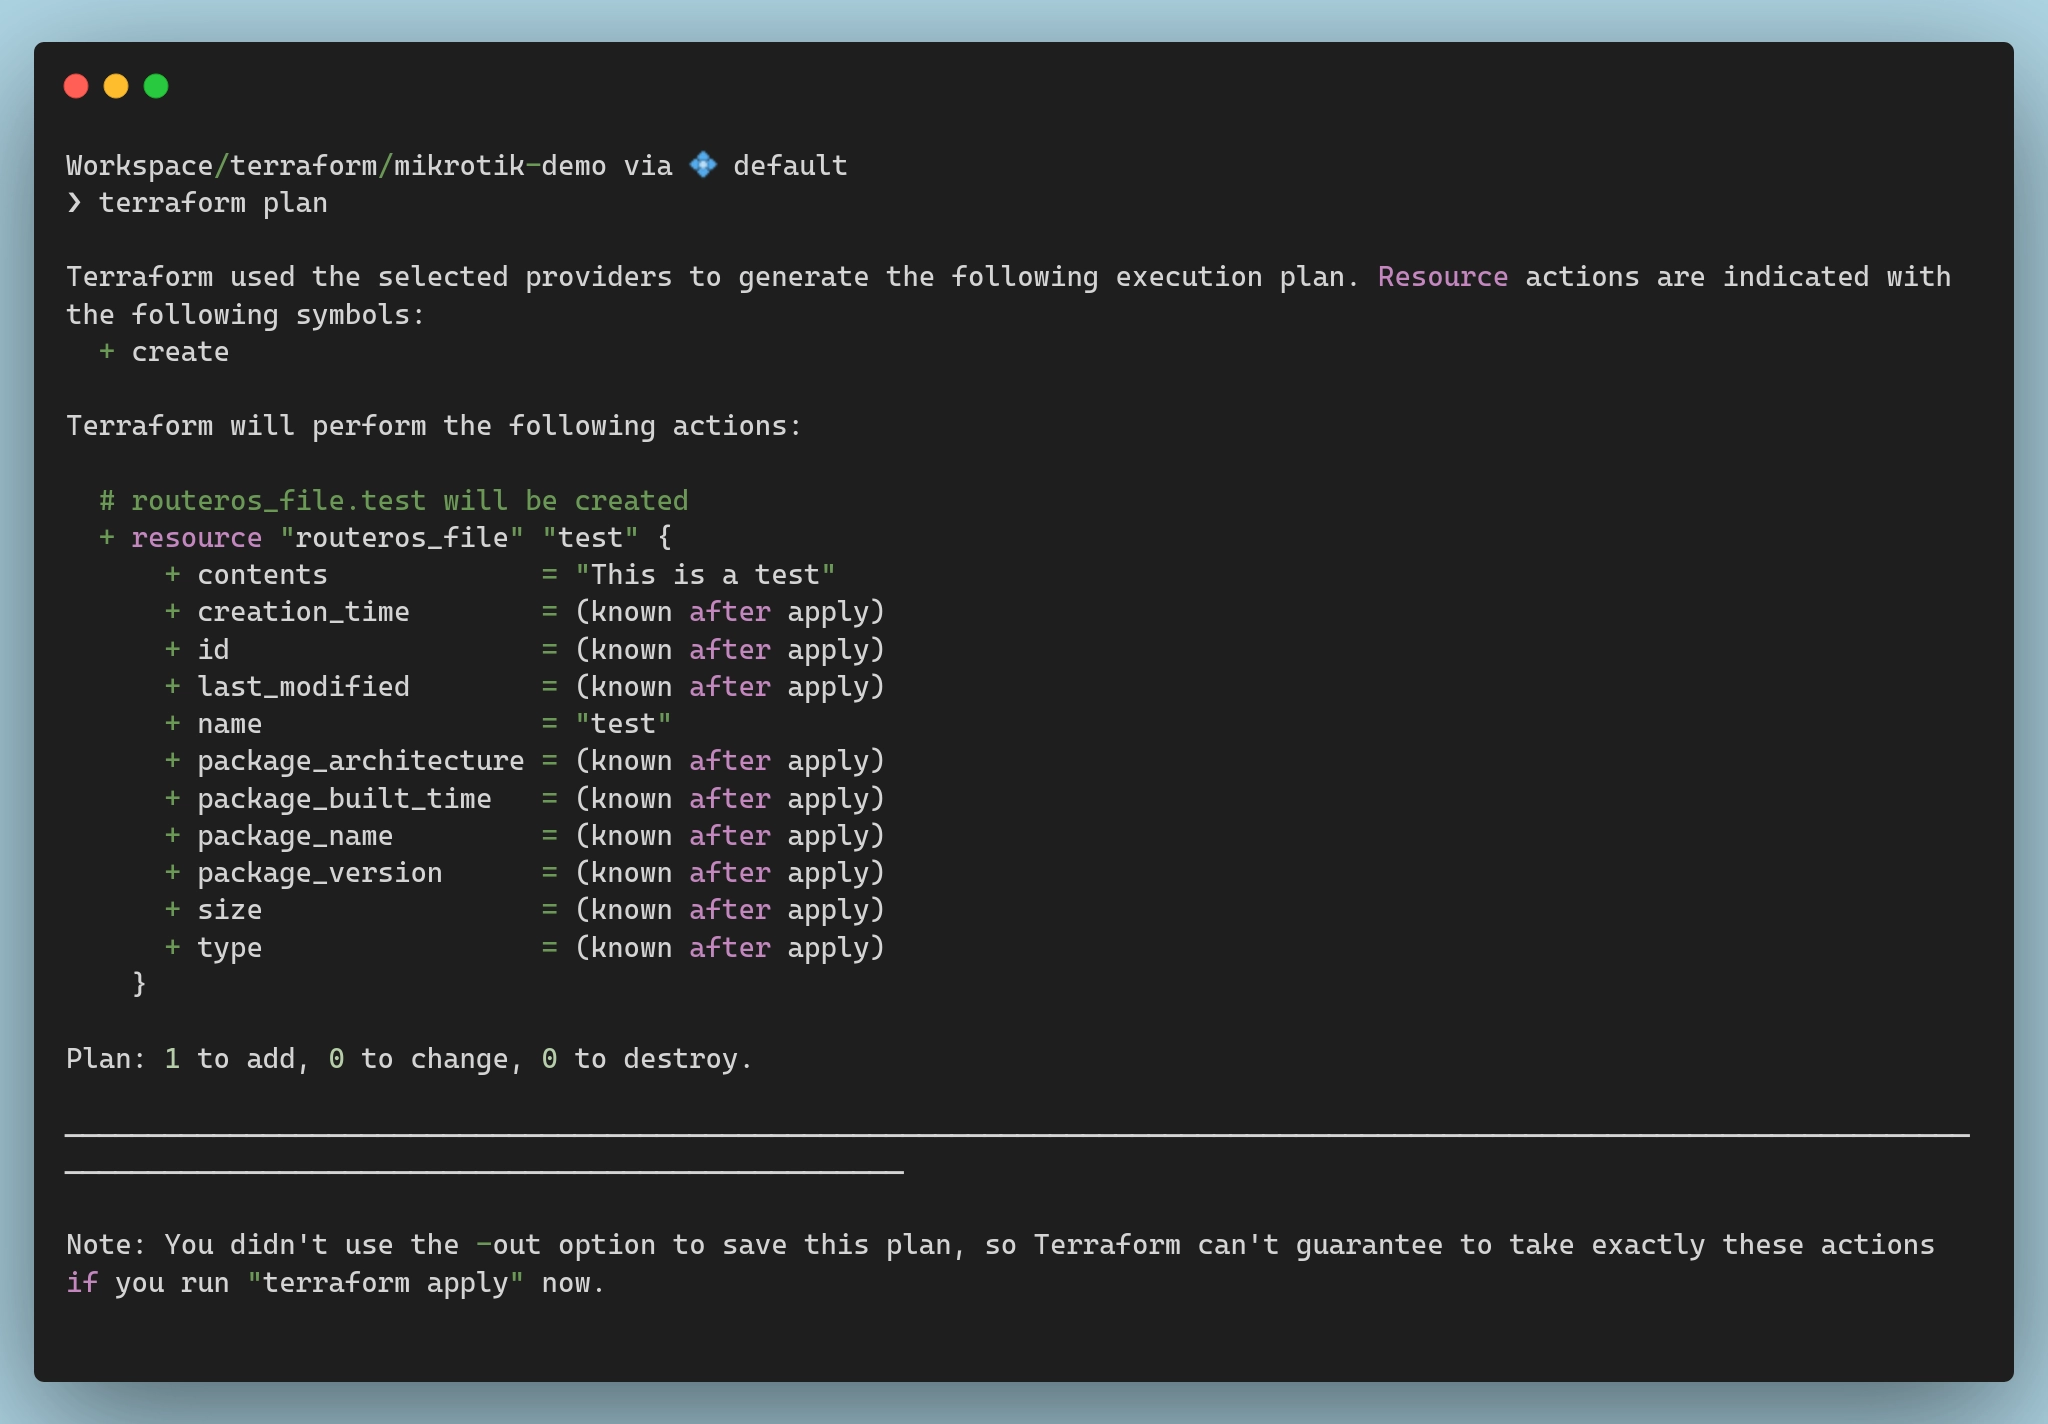
I’ll first create a dummy resource, say a test file, to make sure commands are sent properly to the RouterOS API:
| |
With all this in place, I should be able to run terraform apply and see some successful output, right?
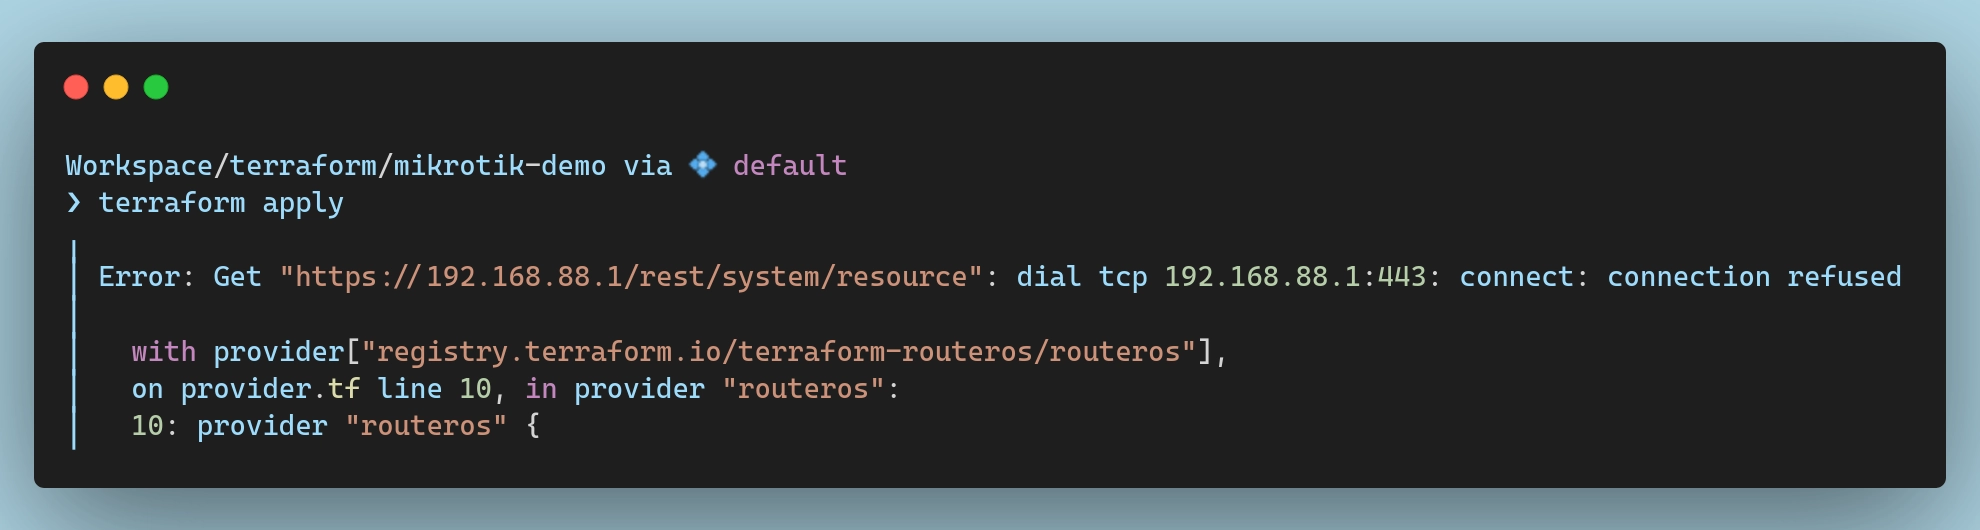
terraform apply failure
I’ll spare you the details and the troubleshooting time. It’s certificates… It’s always certificates… Unless it’s DNS, of course, but if it’s not DNS it’s definitely certificates 😅
RouterOS Setup
Terraform connects to my router via the API, which is the www-ssl service. Not to be confounded with the api or api-ssl services. No no no no no. Those are, as far as I understand, the older versions of the API and www-ssl is the newer REST API implementation which we need.
Thus, before Terraform can connect to my router, I need to ensure that the www-ssl service is properly configured. By default, RouterOS doesn’t enable it and, more importantly, it doesn’t bind a certificate to it. The solution is simple, then. I just need to:
- Create a self-signed certificate authority
- Generate a certificate for the web interface
- Bind that certificate to the
www-sslservice - Enable the service
- Profit???
Long story short, here are the commands I needed to run on my router to set all these up:
| |
I don’t actually recommend copy-pasting these commands as they are rather specific to my setup. You can see the organization I set to mirceanton and so on. Take the extra 30 seconds to customize these commands to suit your setup before running them!
Also, since we’re using a self-signed certificate, you’ll need to set insecure = true in your Terraform provider configuration, if you haven’t done that already.
Validating the Connection (again)
At this point everything should be all set up and ready to go. For real this time! To test that, I will run terraform plan once again:
terraform plan fixed
If you see output similar to the above, then it means terraform has successfully connected to your Mikrotik device, and you’re ready to move on to the next steps!
Importing the Default Config
When bringing a MikroTik device under Terraform management, you pretty much have two options:
- Reset the router and build from scratch,
- Import the existing configuration into Terraform
Each option has pros and cons, and I’m not really going to debate which is better and why.
The former option, at least in terms of the procedure, is simpler. You just reset the device (assuming it’s not already at factory settings) and start terraforming right away. The downside is that you either have to do things in a very specific order since resetting your device will cut off your internet access which you might need to download providers or in case you are using a remote state backend. But hey… at least you don’t have to bother with terraform import-ing a lot of resources.
The latter is a bit more involved, since you have to create matching/equivalent terraform resources for every bit of configuration that comes in the default config and then fetch their IDs from the device to import them.
That being said, I’ll go for the second option so that I don’t have to battle configuring my router at the same time as I am battling managing it via terraform. To be honest, I am fairly new to mikrotik devices in general, so I want to take it one step at a time. I want to onboard the default configuration and get a feeling for managing this router via terraform and I can get fancy with the config later on.
For now, let’s start importing the default configuration that came with my RB5009. While I won’t drop the entire export here, I did save it in a gist if you’re interested.
Certificate
Let’s start off by importing the certificates we created earlier. Creating them with terraform looks something like this:
| |
There are a couple of things to note here.
First off, we’re specifically ignoring changes to the sign status of the resources via the lifecycle block to avoid deleting and re-creating the certificates after the import.
Secondly, while we’re specifying that the local-root-cert is signed with no extra config, we are explicitly stating that webfig is signed with local-root-cert as the CA.
If I were to apply this right now, however, the operation would fail. Terraform would send the request to the ROS API to create 2 new certificates and RouterOS will complain saying that they already exist.
To fix that, I need to import them into my state. This can be done either manually by running a terraform import command, or by adding an import block in my terraform config.
Regardless of which option I choose, I firstly need to get the IDs of the certs.
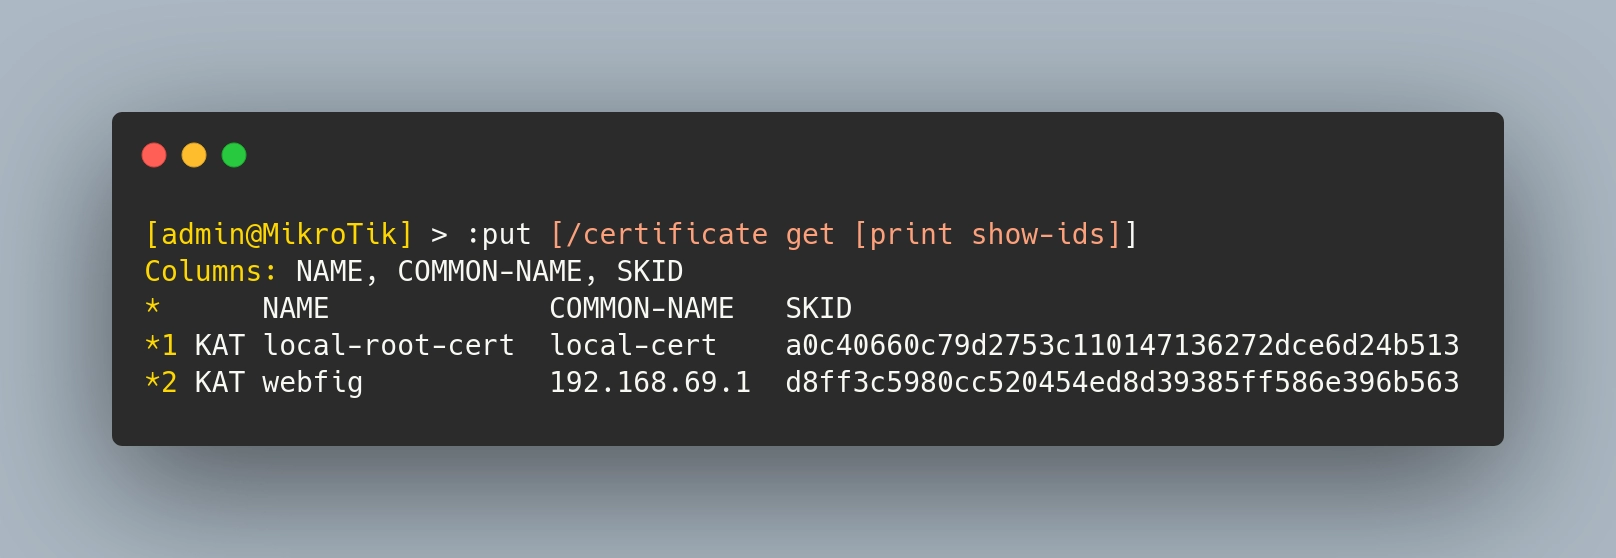 Certificate resource ID
From this output, we can see that local-root-cert has an ID of *1 and webfig is *2 (the “*” is actually required). To import them, I will add the following import blocks to my certificates.tf file:
| |
Almost every resource we create today will have to be imported since we are trying to take over the default configuration. From now on, to keep things a bit more concise, I will add the command to get the resource ID from Mikrotik in the initial code snippet and then add an import block in all my terraform configs.
This will make sure that I can just terraform apply my code and it will automatically import all of the resources and update them if needed.
IP Services
Getting the services sorted out was, surprisingly, very simple. The official documentation has the perfect example listed so all I really had to do was to copy-paste it into my config and make some small adjustments:
| |
With this, I am making sure that all of the services I don’t need are disabled, and, most importantly, all of the services that need TLS have the webfig certificate bound to them.
These resources don’t actually need to be imported, so there’s nothing else to do here. We can safely apply this config and move on with our lives.
Bridge Interface
By default, Mikrotik creates one bridge interface per switch chip in your device. As far as I understand, this is due to performance optimizations since only one bridge per switch chip can take advantage of hardware acceleration.
There’s nothing stopping you from creating more, just know that it will likely perform poorly since traffic between them will be processed by the CPU instead of the switch chip.
Since my RB5009 has only one switch chip, it has one default bridge called… well… bridge 😅.
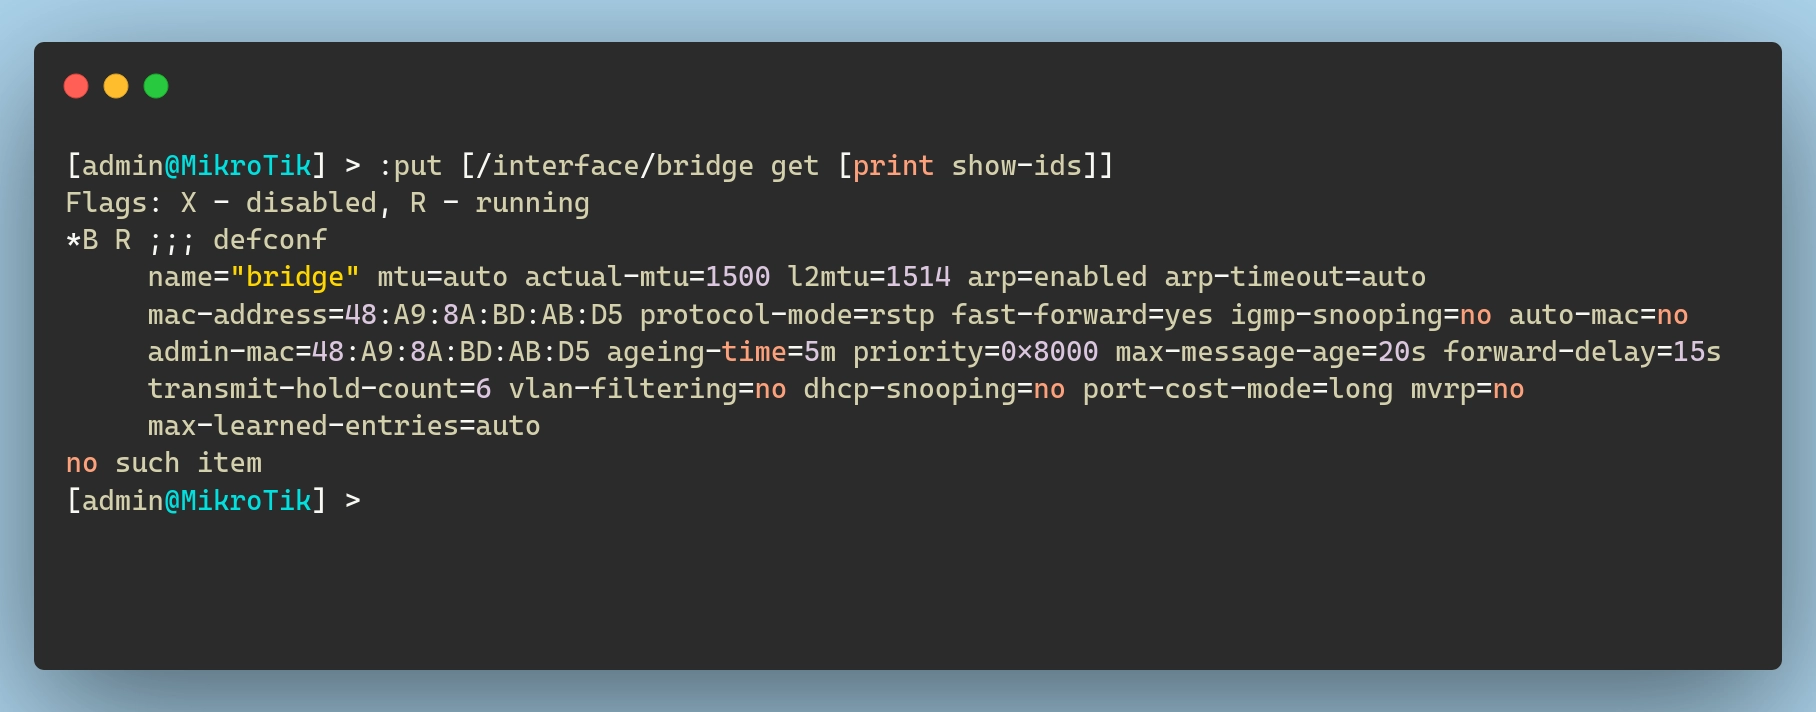 Bridge Interface resource ID
I can define this bridge as a terraform resource like so (note that I don’t include the “defconf” comments):
| |
Bridge Ports
With the bridge imported, I can now move on to the bridge ports. Typically, one interface will be dedicated as a WAN port (in my case ether1), and then all other interfaces will be added to this bridge as part of the LAN network:
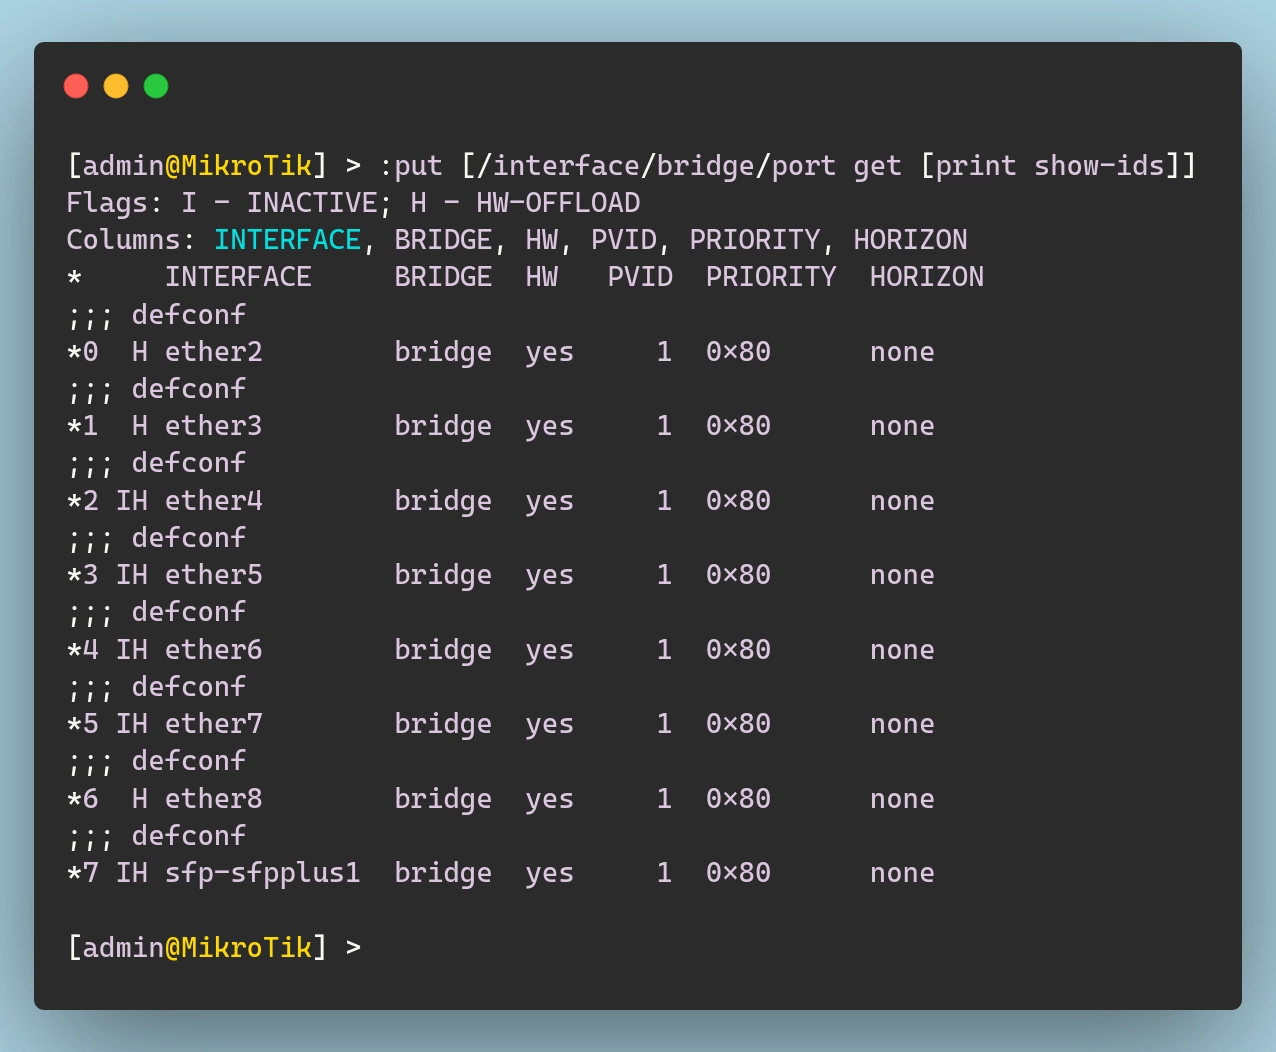 Bridge Port resource IDs
In terraform terms, we can bundle together all bridge ports into a single resource with a for_each block to keep things a bit cleaner, both for the import part and for the actual resource definition:
| |
IP Addresses
By default, a Mikrotik router comes configured with two IP settings:
Static LAN IP: This is the IP address used by devices on the local network. In my default configuration, the router assigns the LAN interface a static IP of
192.168.88.1/24via the bridge.Dynamic WAN IP (DHCP Client): For external connectivity, the router typically obtains a dynamic IP address on the WAN interface through DHCP. In my particular case this won’t actually work, as I am not using DHCP, but we’ll cross that bridge when we get to it.
The IDs for the resources can be exported using the following commands:
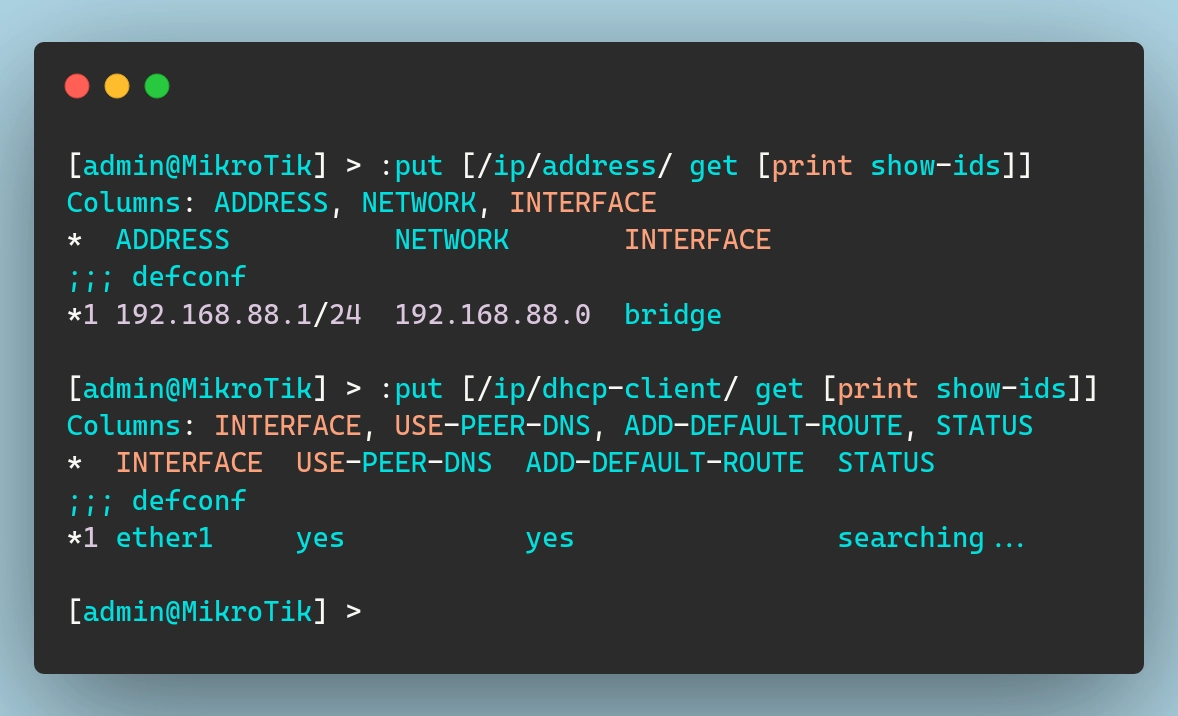 IP Addresses resource IDs
And then we can create the resources in terraform and import them like so:
| |
DHCP Server
Mikrotik routers come pre-configured with a DHCP server on the LAN network so that devices connecting to them automatically receive an IP address. This setup is composed of three elements:
IP Pool: This defines the range of IP addresses that the DHCP server can assign to clients. In my default setup, the pool covers addresses from
192.168.88.10to192.168.88.254.DHCP Server Network: This resource specifies the network details to be handed out to DHCP clients such as the network address, gateway, and DNS server.
DHCP Server: This is the actual service that listens on the designated interface (in this case, the bridge) and assigns IP addresses from the defined pool.
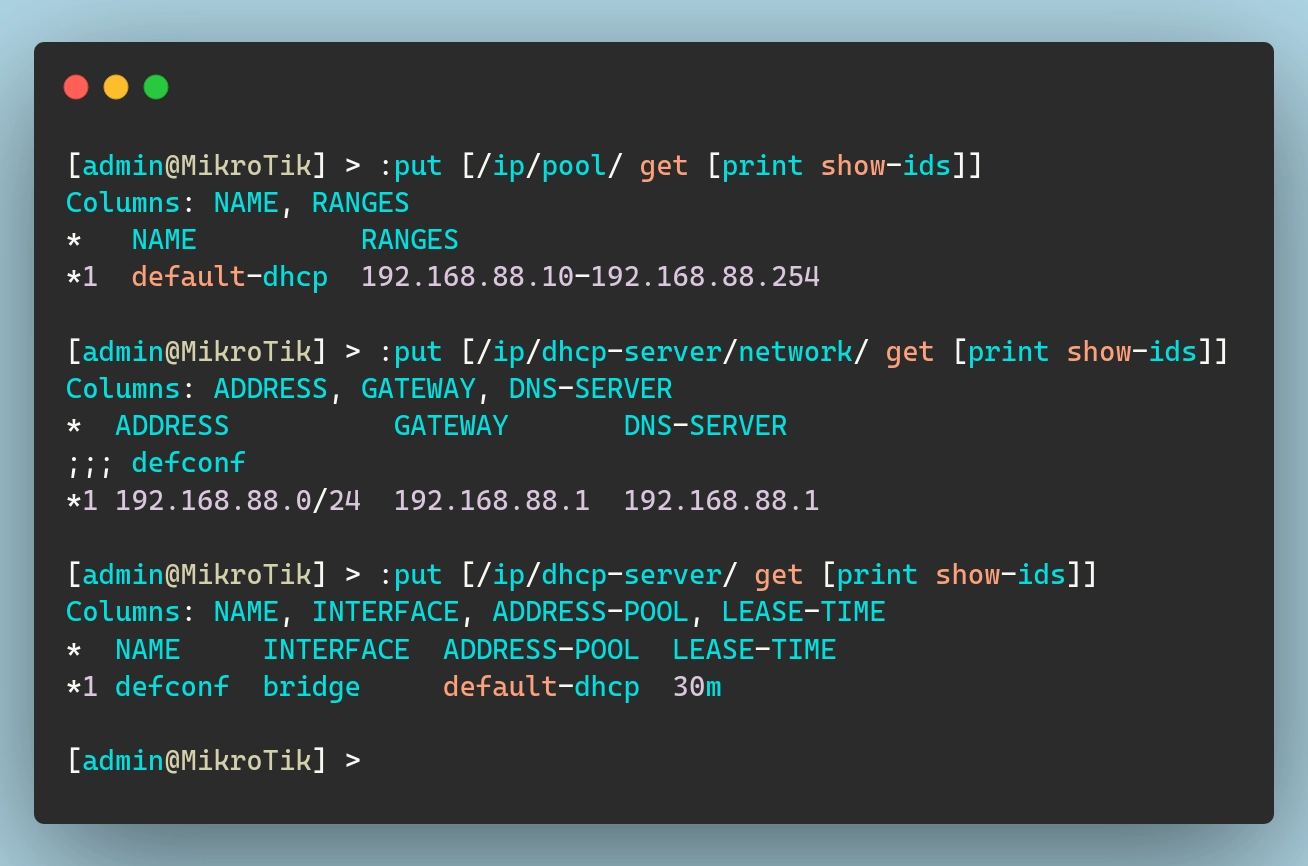 DHCP-Server related resource IDs
Below is how you can mirror this setup in Terraform:
| |
DNS
Mikrotik routers include a built-in DNS server by default, allowing network clients to resolve domain names without needing an external DNS resolver. Additionally, a static DNS entry (router.lan) is created so that the router itself can be easily referenced within the LAN.
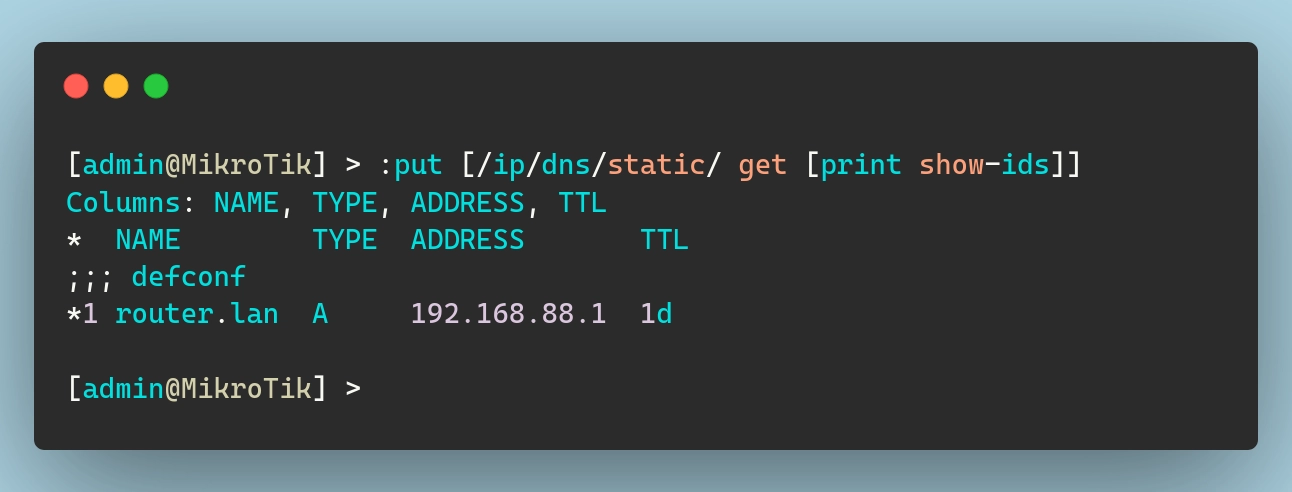 Static DNS Entry resource IDs
To mirror that in terraform, we need the following:
| |
Note that here I am specifying the upstream dns servers as 1.1.1.1 and 8.8.8.8. I think that by default Mikrotik uses the values it receives via DHCP on the WAN interface.
Interface Lists
Mikrotik routers use interface lists to group interfaces together for easier management. These lists are particularly useful when applying firewall rules, routing configurations, and other network policies.
By default, Mikrotik creates two interface lists:
- WAN: Represents the external (internet-facing) interfaces
- LAN: Represents the internal (local network) interfaces
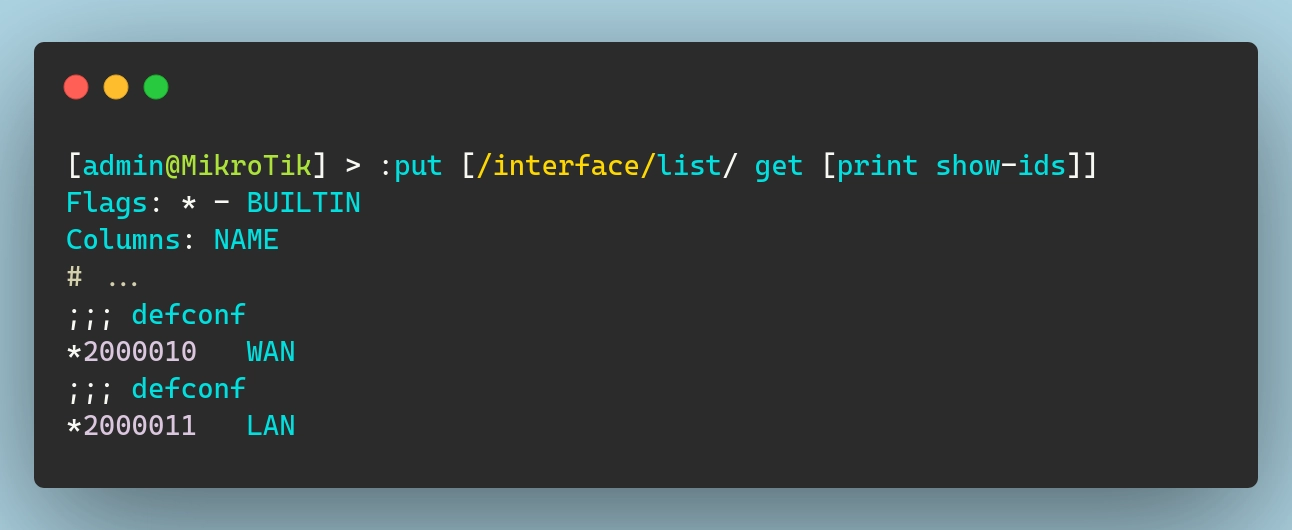 Interface List resource ID
To replicate this setup in Terraform, we need to define the interface lists like so:
| |
Additionally, interfaces are assigned to these lists as follows:
- The bridge interface (which includes LAN ports) is added to the
LANlist. - The ether1 interface (usually the WAN port) is added to the
WANlist.
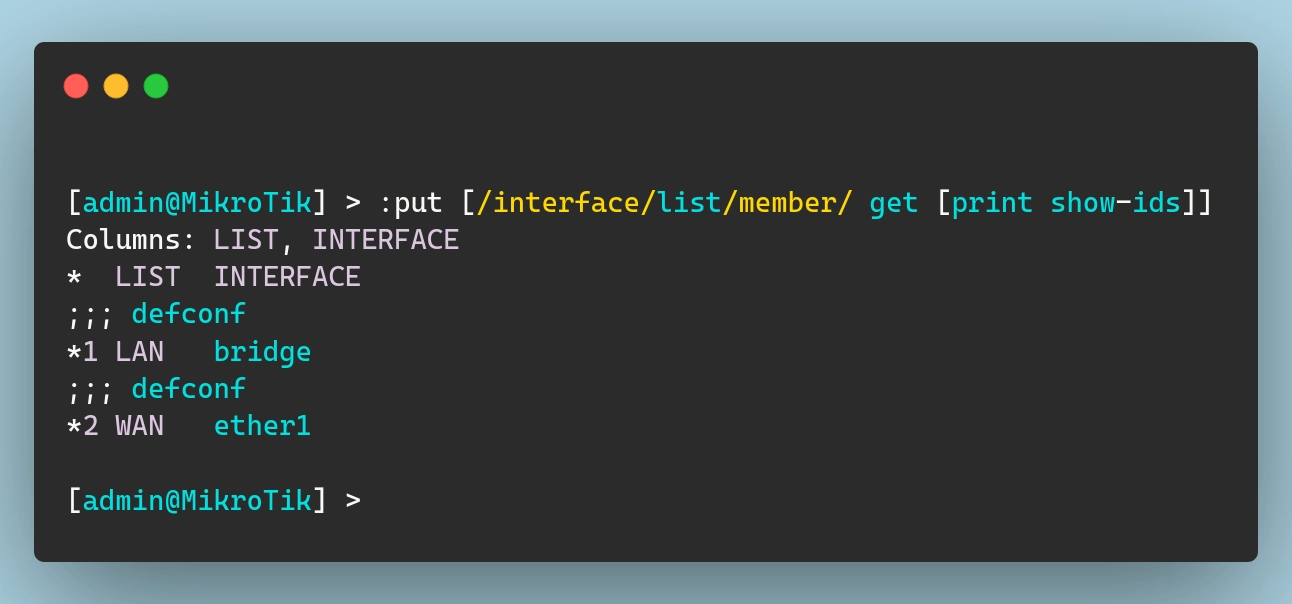 Interface List Member resource ID
| |
These interface lists are particularly useful when configuring firewall rules. Instead of applying rules to individual interfaces, we can apply them to entire groups. This makes managing network security and policies much easier.
IPv4 Firewall
Speaking of the devil, let’s talk about firewall rules now. For the sake of keeping this post within a reasonable length (and also to hopefully hide my noob-ness), I won’t go into detail about the default firewall ruleset.
All I’m going to say here is that firewall rules are applied from the top down. This means that, when you read the list starting from the top, if traffic matches one of the rules it will get filtered accordingly. If it does not, it keeps going down the list until it either finds a match or it reaches the end.
If it reaches the end without finding a match, mikrotik has, for whatever reason, a default allow policy in place. This means that having no firewall rules will actually leave you wide open instead of completely blocked, as would be the case with other firewalls.
With that being said, here is the default ruleset for IPv4:
| |
Importing all of this into terraform would be pretty annoying given that each rule would be an individual resource. Given that I currently don’t have internet connectivity anyway, it will be much quicker and easier to just delete all firewall rules and then re-create them from terraform.
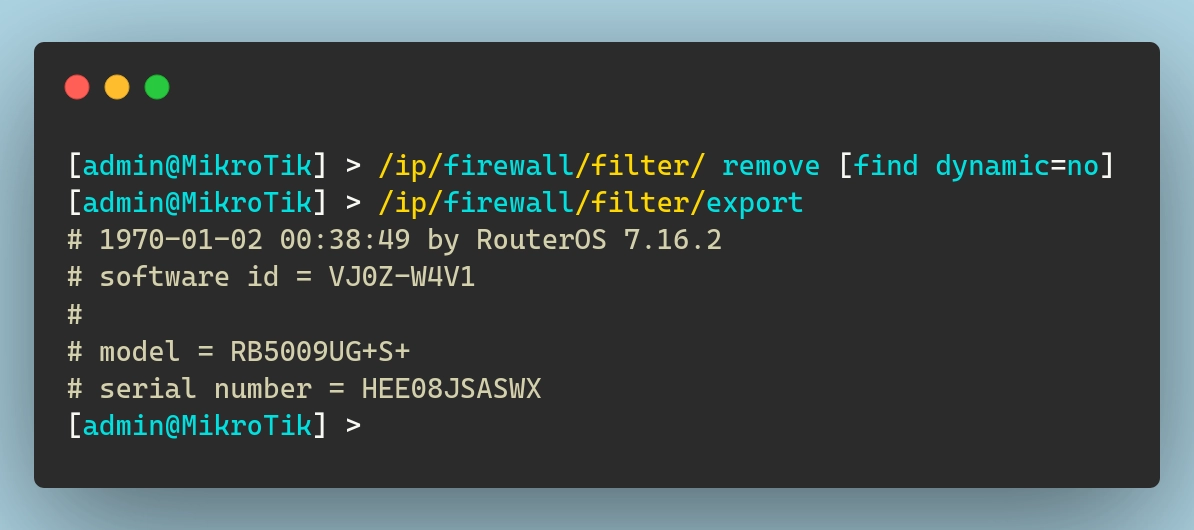 Deleting all IPv4 firewall rules
And now to re-create them all in terraform, we need to add the following code to our firewall.tf file:
| |
Note that, since ordering is important, we do have the
place_beforeargument for each rule to ensure they end up in the correct order. {.prompt-info}
There probably is a way to make this code more efficient/clean using a loop block or a similar approach. Given how critical firewall rules are, however, and especially given the risk of locking myself out due to misconfigurations, I’ve decided to keep things dumb and define each rule as a separate resource.
NAT Configuration
Mikrotik routers use NAT (Network Address Translation) to allow devices on the internal network (LAN) to access the internet through the WAN interface. This is done using a masquerade rule, which dynamically translates private IP addresses into the router’s public IP:
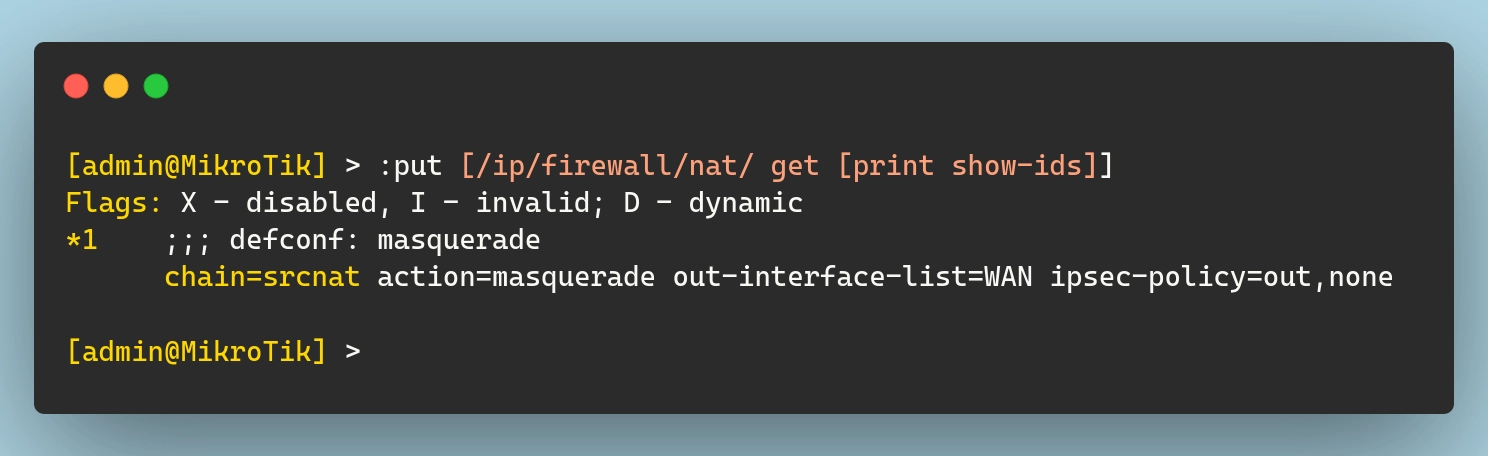 Firewall NAT resource ID
To replicate this setup in Terraform, define the resource:
| |
IPv6 Rules (or Lack Thereof)
You might be expecting some detailed IPv6 firewall configurations here. I am, however, going to keep this section short. I’m fully aware that some might not agree with this approach, but here we go…
Simply put, I don’t use IPv6 in my network. I have no need for it at the moment, and I don’t want to complicate things by introducing it needlessly into my setup. I may change my mind and explore it in the future, but I’m not going to bother with it right now.
With that in mind (and with the comment section now full of angry people), the solution here is simple. I’ve decided to disable IPv6 entirely. 😅
| |
Miscellaneous Configurations
The default config includes a few additional settings that control network discovery and administrative access. These settings ensure that only devices within the LAN can discover and manage the router.
- Neighbor Discovery → Only devices in the LAN can see the router via Mikrotik’s Neighbor Discovery Protocol (MNDP).
- MAC Server → Restricts access to the router’s MAC-based login services (used for debugging and management).
- Winbox MAC Access → Limits MAC-based access via Winbox (Mikrotik’s GUI management tool) to LAN devices.
| |
To mirror these settings in Terraform:
| |
For a nice change of scenery here, these resources don’t need to be imported. We can simply create them and the ROS API will modify the config as needed.
Modifying the Default Config
I mentioned in the introduction of this blog post that I want to make as few changes as possible to the default config in order to get internet access. Well… I lied. I am also going to make 2 additions to this configuration that are not strictly speaking required but are things I typically do on any machine once I start managing it.
Basic System Settings
Setting the hostname, or identity, as Mikrotik calls it, and the timezone of a machine are basic things I do every single time I get a new computer in my lab. Fortunately, the RouterOS API exposes these settings and the terraform provider implements them. I will set my hostname to Router (very clever, I know 😉) and the timezone to Europe/Bucharest:
| |
PPPoE Config
I mentioned a couple of time throughout this process that the default DHCP client on the WAN does not work for me. This is because my ISP uses PPPoE to assign me an IP address.
This means that in order to get an IP address and be able to access the internet I need to:
- Remove DHCP Client,
- Create a PPPoE Client Interface (with credentials),
- Add PPPoE to the WAN interface list.
The first step is rather easy. Assuming I delete the code for the DHCP client, terraform will simply remove that config from my router on the next apply command.
As for the second step, I need to create a PPPoE client and configure it to use my credentials. Just as I did when I had to specify my ROS credentials, I will configure my username and password as variables like so:
| |
Now I can add them to my credentials.auto.tfvars file I mentioned previously and reference them in the actual terraform resource. Also, I want to make sure to add this pppoe interface to my “WAN” interface list. This ensures that my firewall and NAT rules still apply to the new WAN connection:
| |
Wrapping Up
At this point, I think I covered the basics and set up a fully functional, automated MikroTik configuration using Terraform. I can access the internet again and all of my config is defined as code. Let’s run one glorious terraform apply command to see all resources being imported/created and/or updated: